In this guide, we will explain and demonstrate how to install ISPConfig on Ubuntu 24.04 LTS. We will showcase a step-by-step ISPConfig installation using both Apache and Nginx.
ISPConfig supports two types of installation: single-server and multi-server. I have elaborated on each installation type with specific scenarios and diagrams. Additionally, I have explained in detail the ISPConfig auto-installer arguments for various installation scenarios.
What is ISPConfig?
ISPConfig is a free and open-source web hosting control panel for Linux servers. Due to its rich features and maturity, it is highly popular and is often considered a good alternative to commercial panels like cPanel, Plesk, InterWorx, etc.
ISPConfig offers comprehensive web, email, and DNS hosting features, along with monitoring and system security. It has multiple user levels, such as administrators, resellers, clients, and email users; each user has specific features and access privileges.
Key Features
- Web Hosting: Manage multiple websites with support for Apache and Nginx.
- Email Hosting: Create and manage email accounts, aliases, and filters.
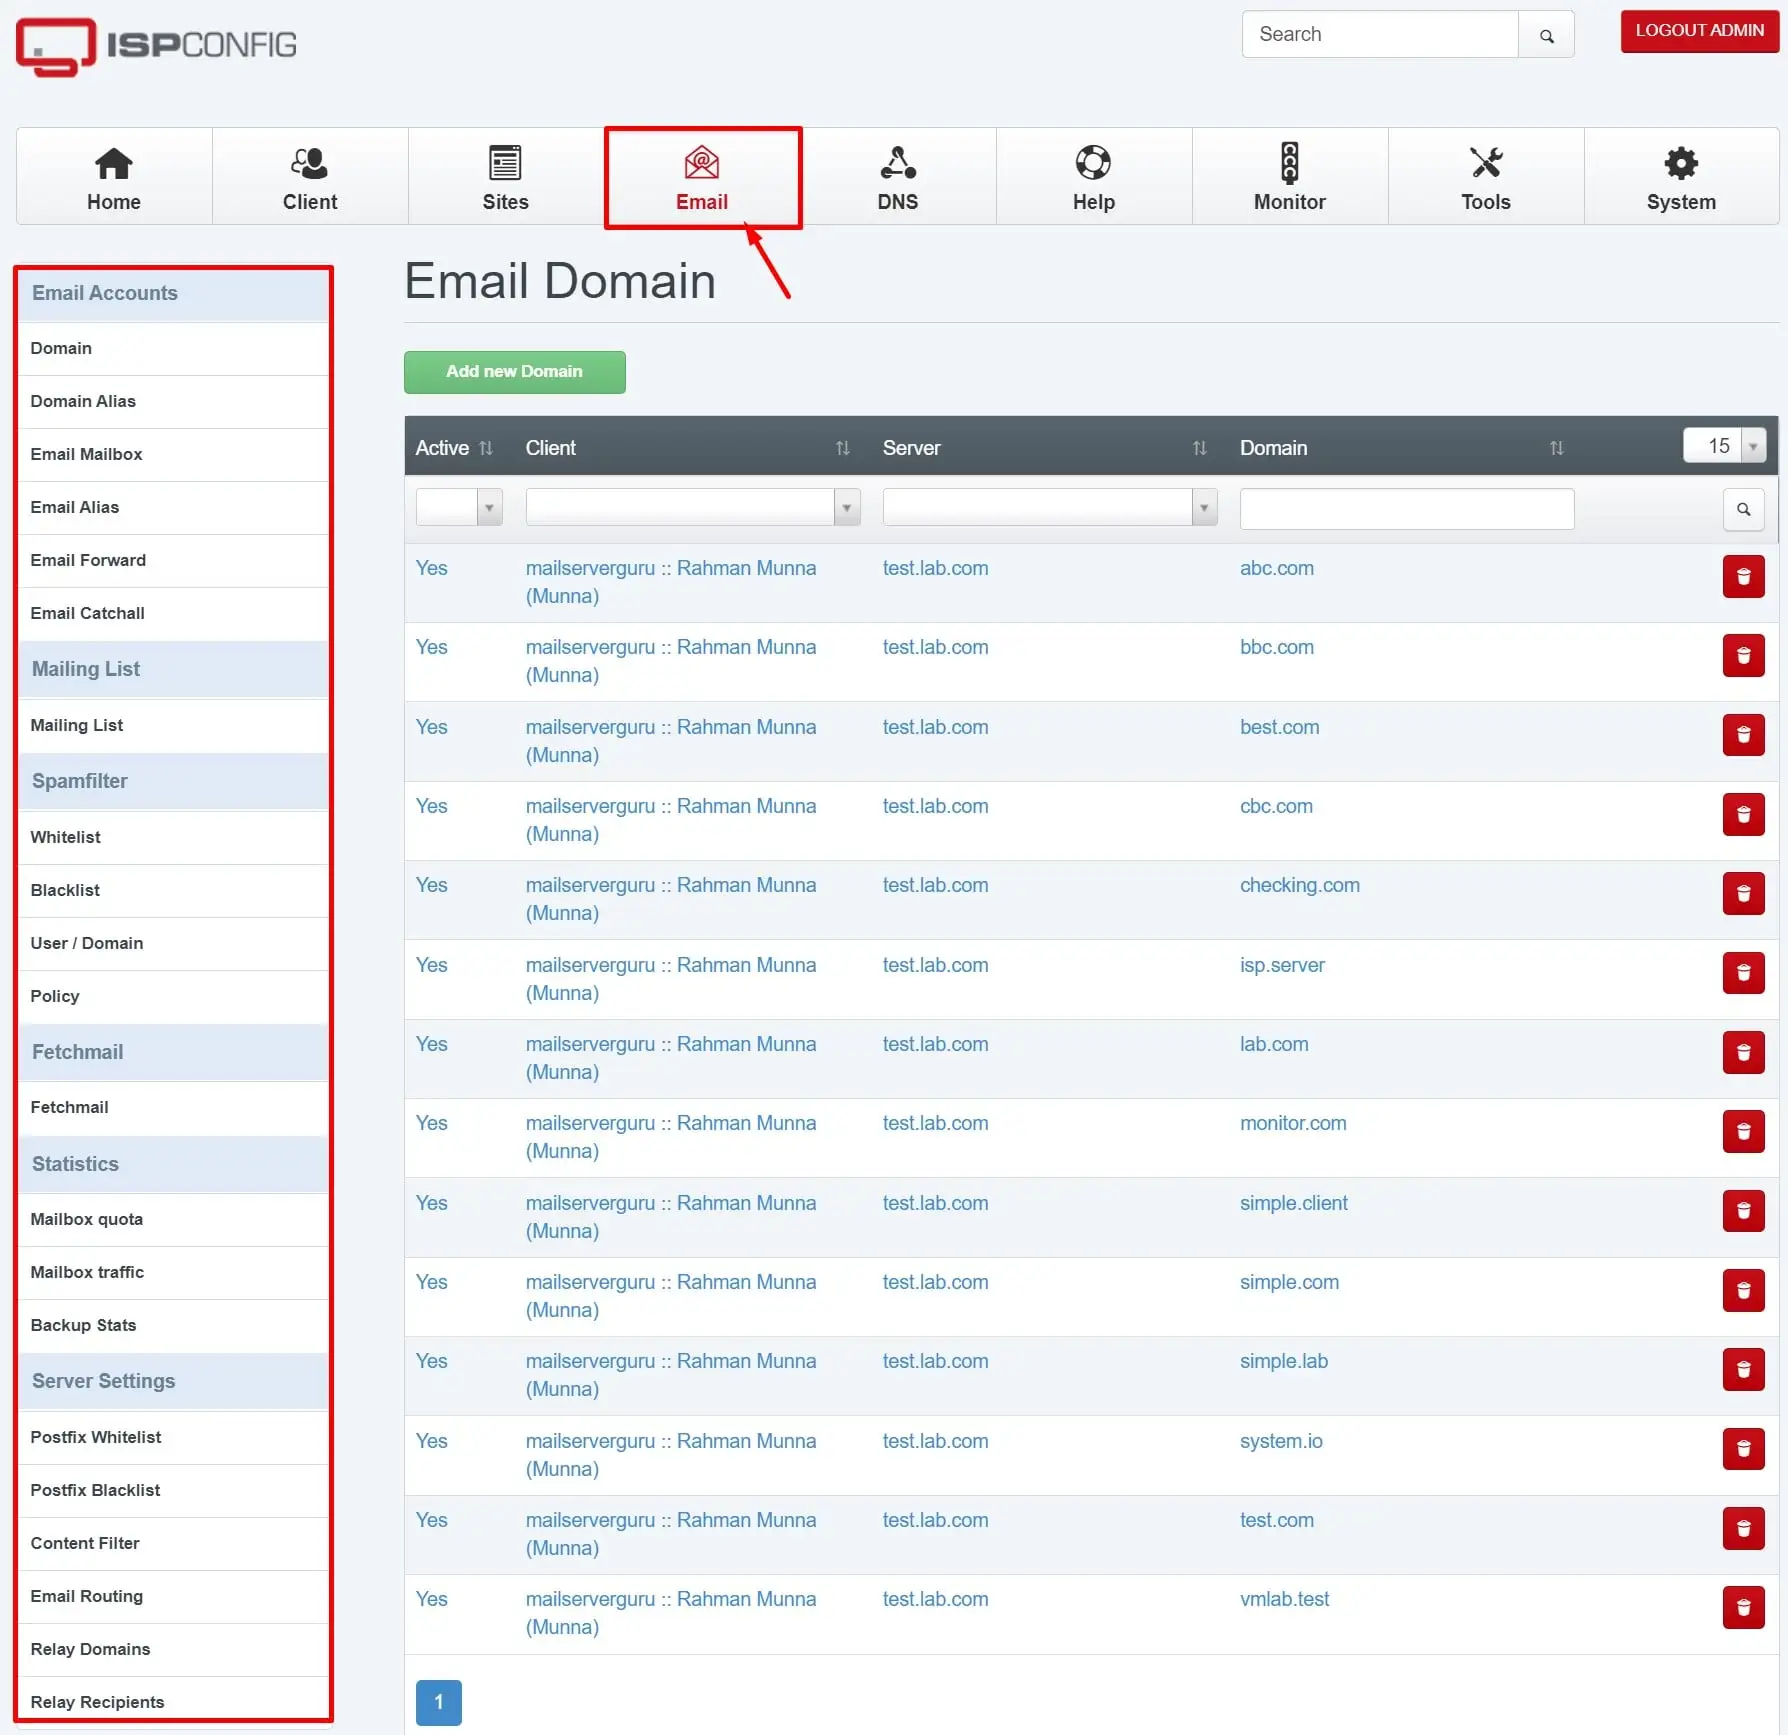
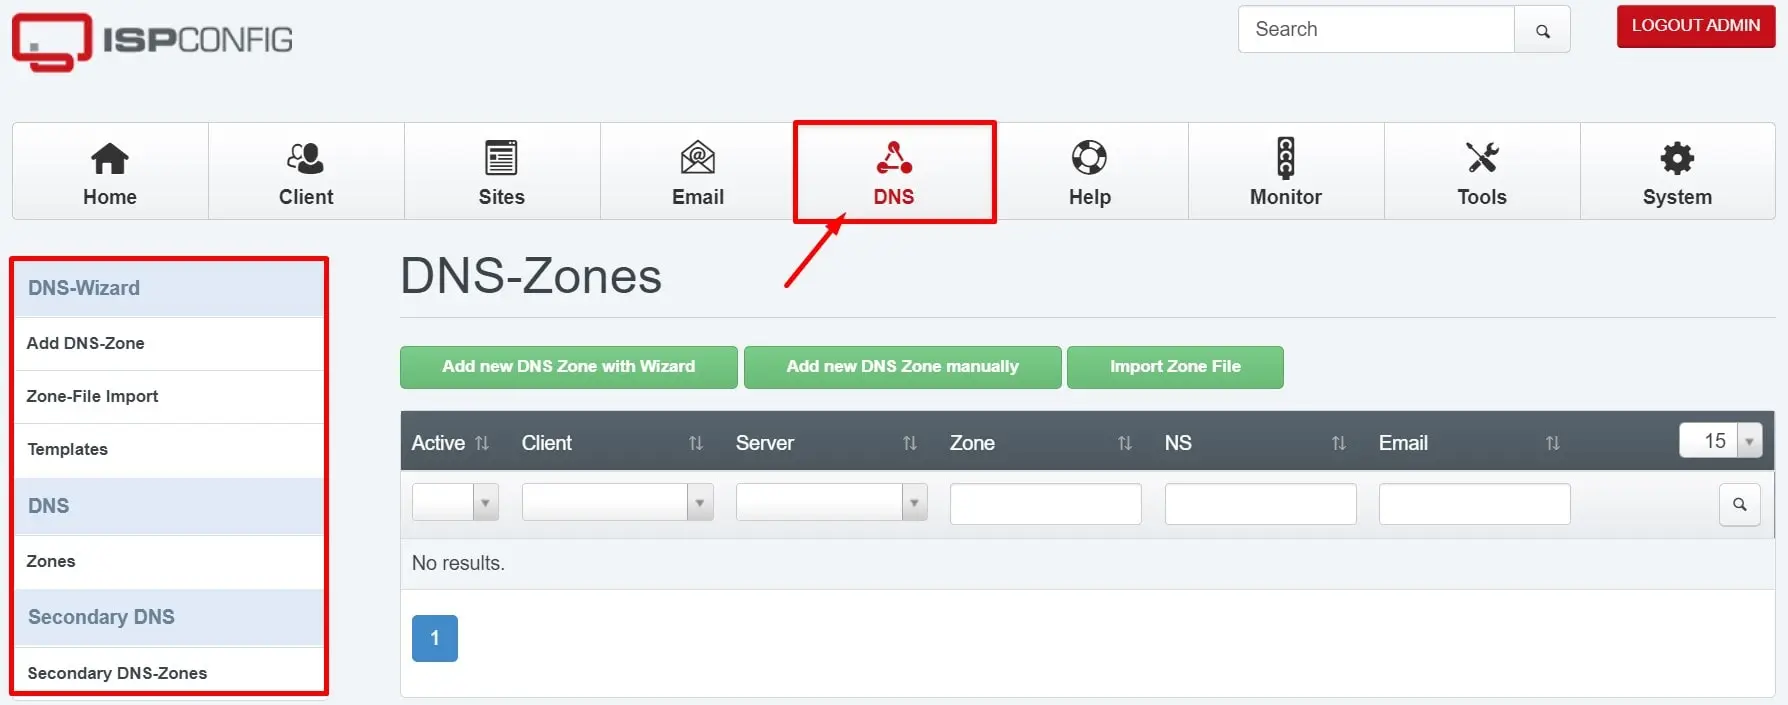
- DNS Hosting: Full DNS management with support for all common record types.
- Database Management: Supports MySQL and MariaDB, database creation, and user management.
- FTP Management: Create and manage FTP accounts for easy file access.
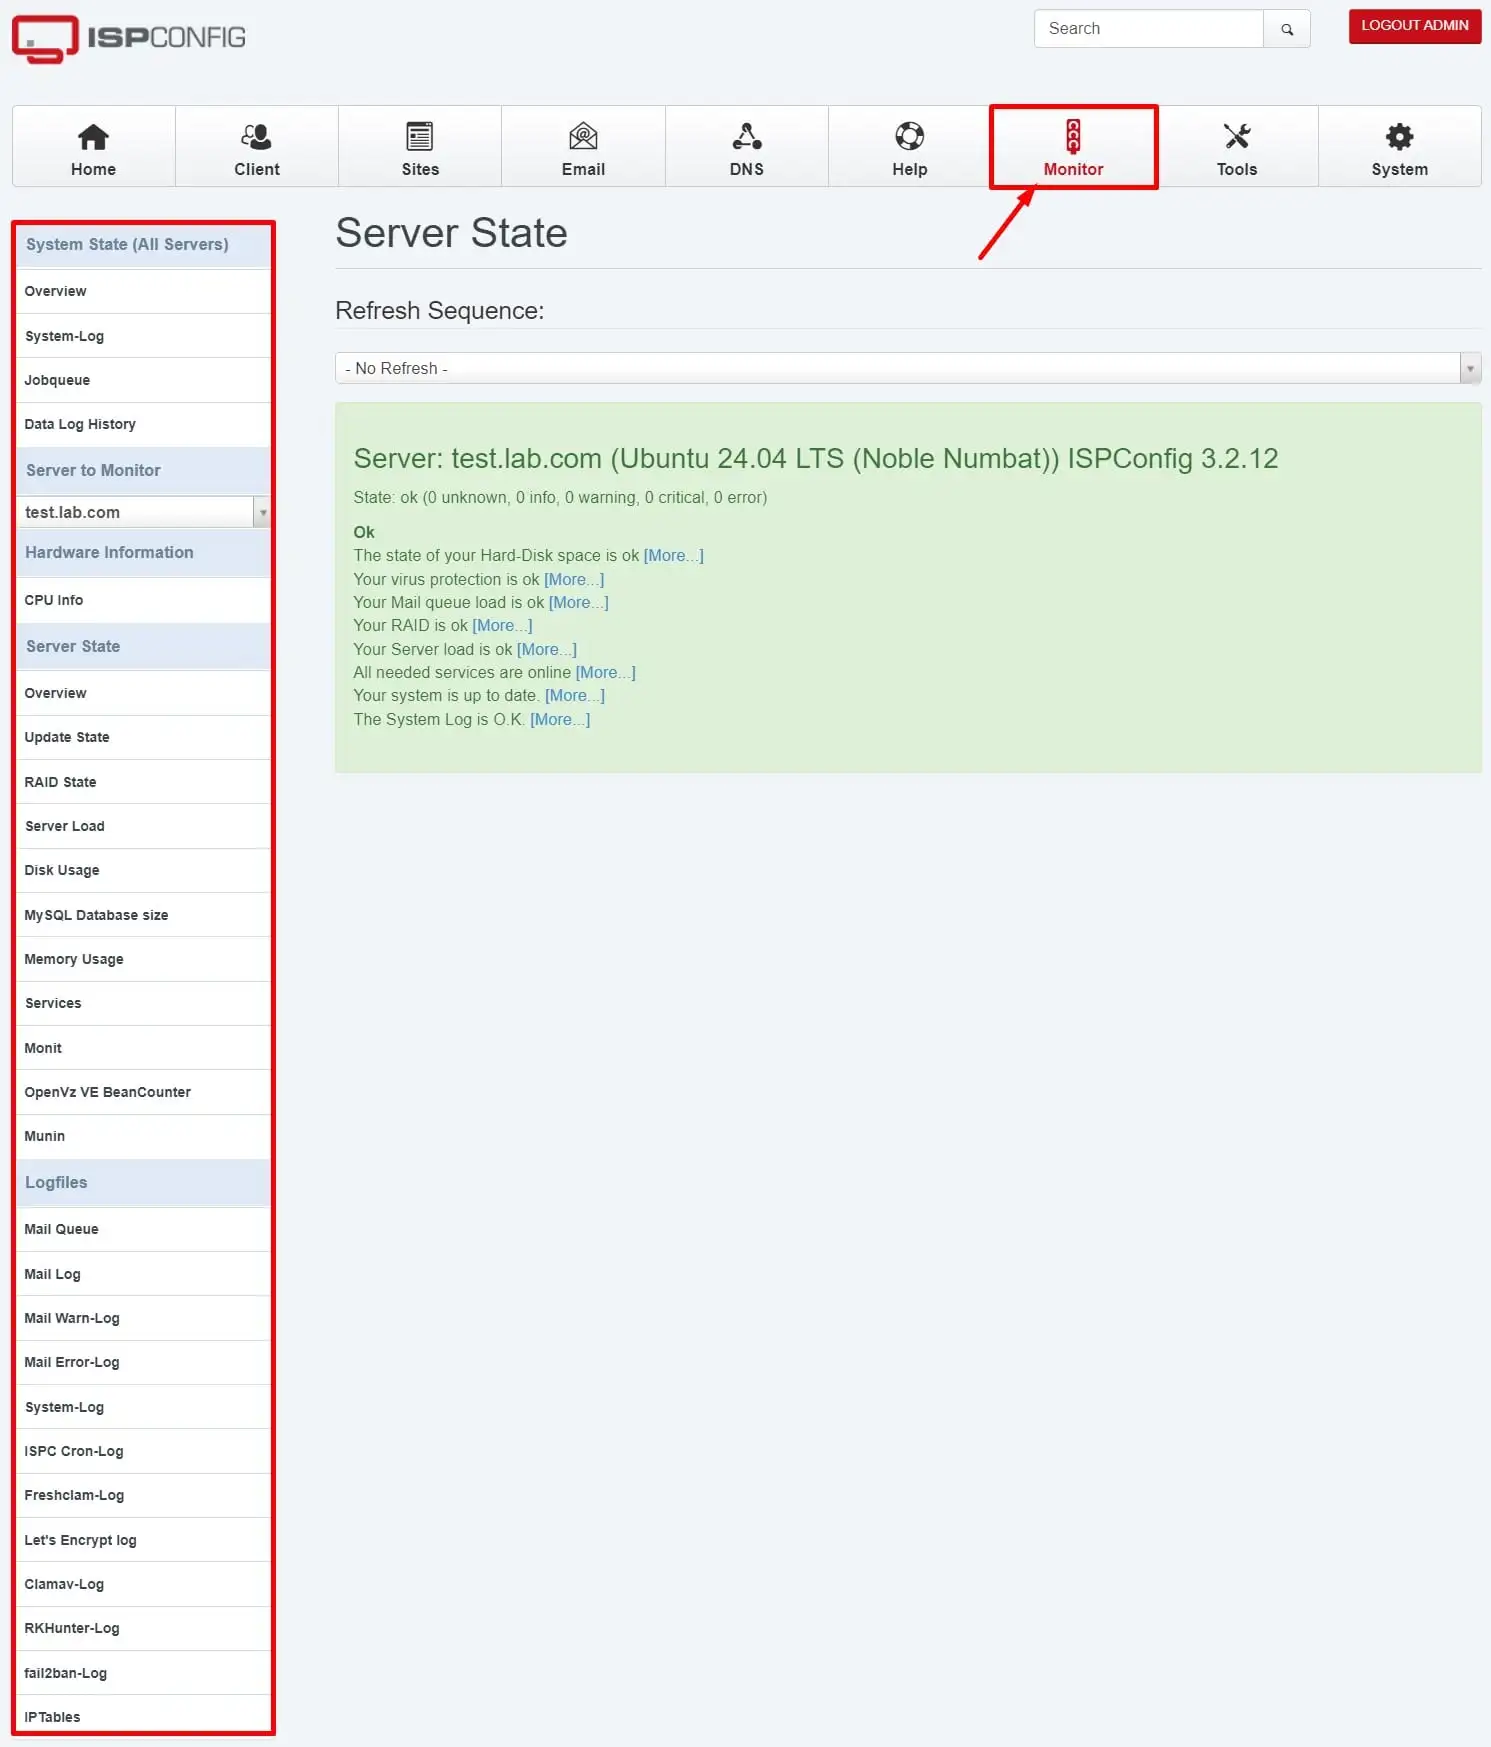
- Monitoring: System monitoring and logging to keep track of server performance and issues.
- Security: Integrated firewall management, SSL certificate handling, and other security features.
- User Levels: Different user roles, such as administrators, resellers, clients, and email users with specific access levels and features.
- Multi-Server Setup: Can set up and manage a multi-server environment for distributing services across multiple servers.
Deployment Methods
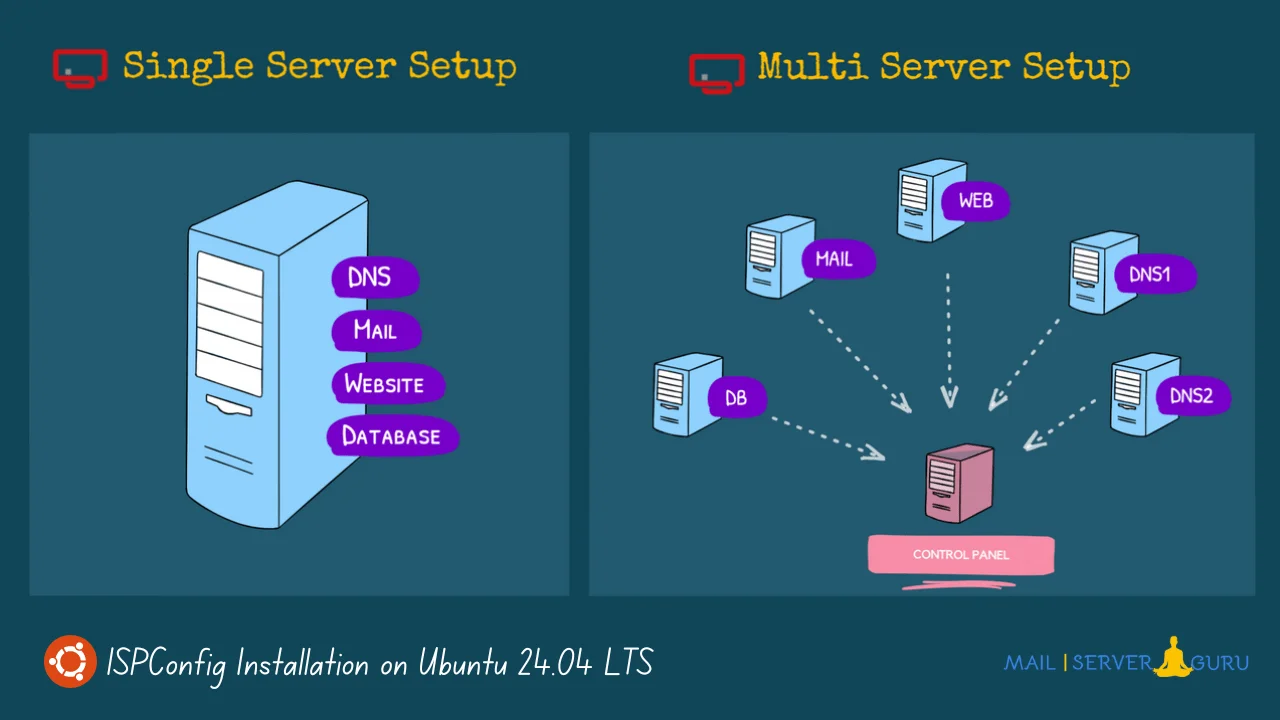
We can install ISPConfig on Ubuntu 24.04 in single-server mode and also in multi-server mode. As we mentioned, ISPConfig supports these two types of server deployment. In a single-server environment, all the hosting services can be installed on the same server. In multi-server mode, we can install services in distributed mode. The figure below illustrates both environments.
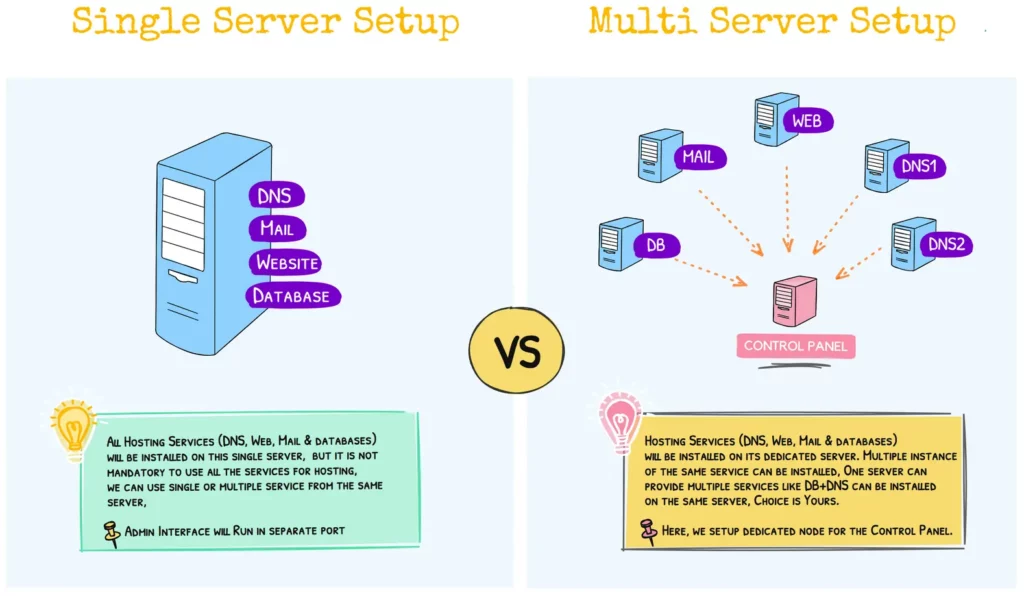
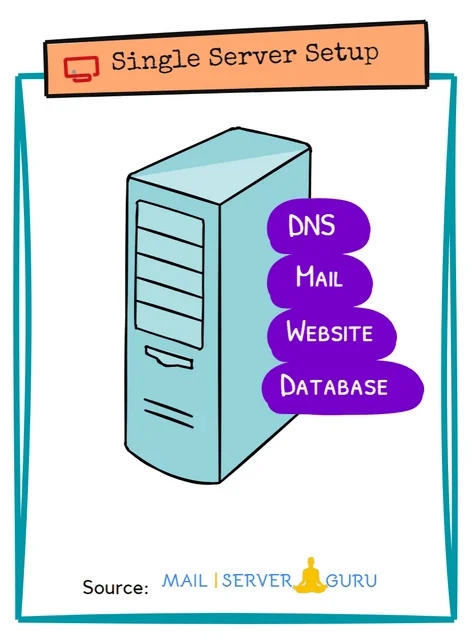
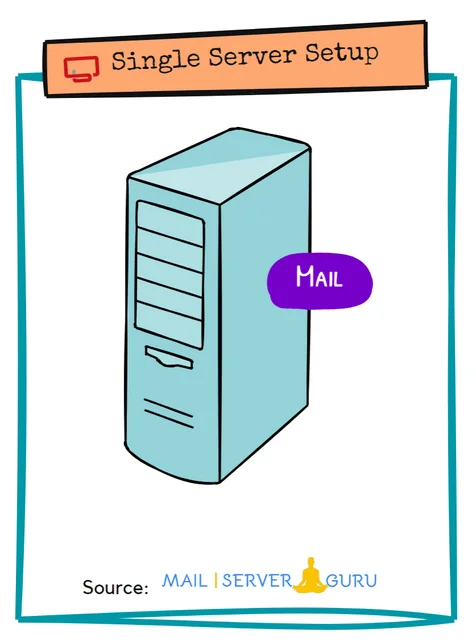
ISPConfig Single-Server Deployment
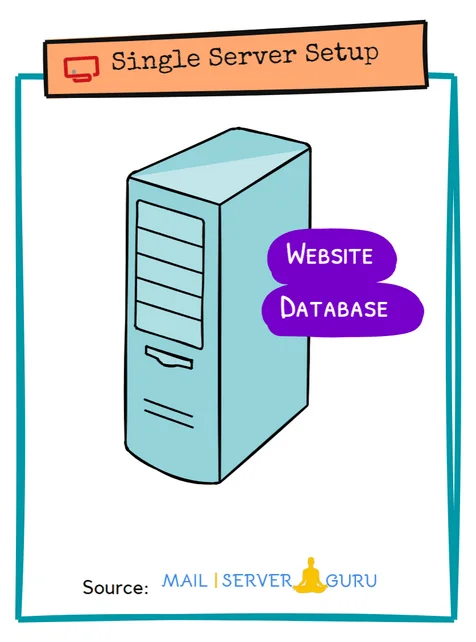
In single-server mode, all hosting services, such as DNS, Web, Mail, and Databases, will be installed on the same node. This configuration represents a complete ISPConfig install on Ubuntu 24.04. However, we can customize the setup based on our requirements. For example, if we only want to host websites, we can choose to install only the Web services.
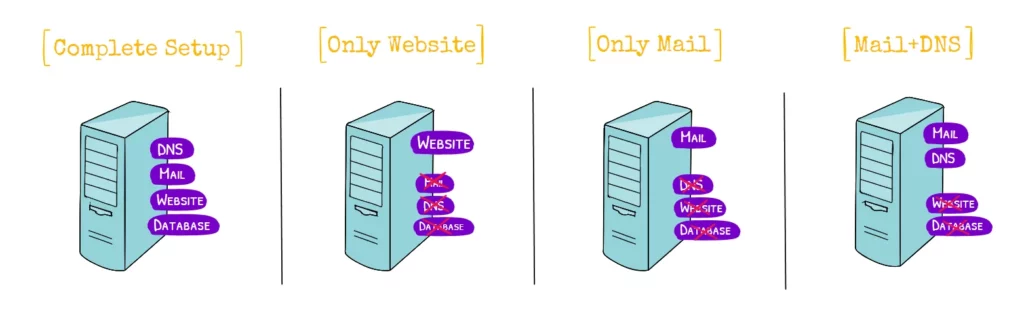
Similarly, if we only need to provide email and DNS services, we can choose to install only those. In such cases, ISPConfig will manage only the selected service, and the other service options in the ISPConfig interface won’t work. However, system administrative options will remain functional across all setups.
ISPConfig’s single-server deployment options are flexible; we can deploy servers only based on our needs. The installation supports:
- Single server with all services: DNS, Web, Mail, and Databases.
- Single server with a single service: A server dedicated solely to web or email hosting.
- Single server with multiple services: We can install Mail and Web services on the same host.
ISPConfig Multi-Server Deployment
If we consider the hosting services (DNS, Web, Mail, and databases) as roles, then ISPConfig is, by default, a multi-role system. When we install ISPConfig on Ubuntu 24.04, we have complete freedom to choose which role should reside on which server. This is all about our hosting requirements and deployment planning.
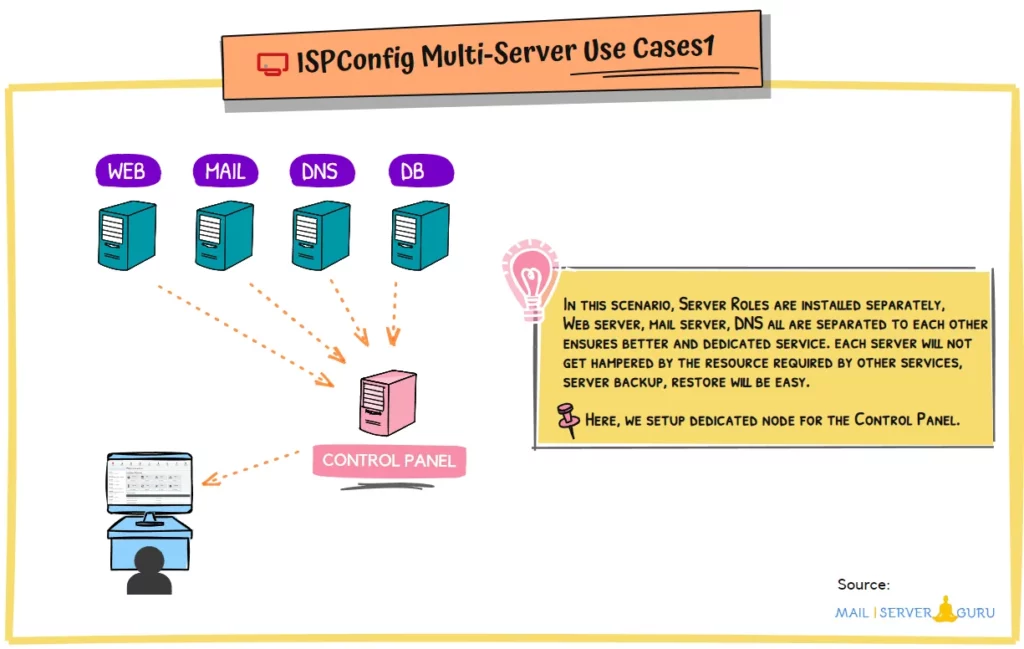
Use Case1:
A simple approach could be to install each role separately onto its dedicated server. This ensures flawless service, as each specific service will have all the resources to itself, eliminating chances of resource contention with other services. Below, we depict a multi-server use case, where DNS, web, mail, and database services are installed on their dedicated hosts.
Use Case2:
Due to business requirements, you might need to expand to multiple web and email servers to meet user demand. The design below shows how a multi-server setup can distribute the load and provide fail-over in case of server failure, which is especially helpful for hosting companies.
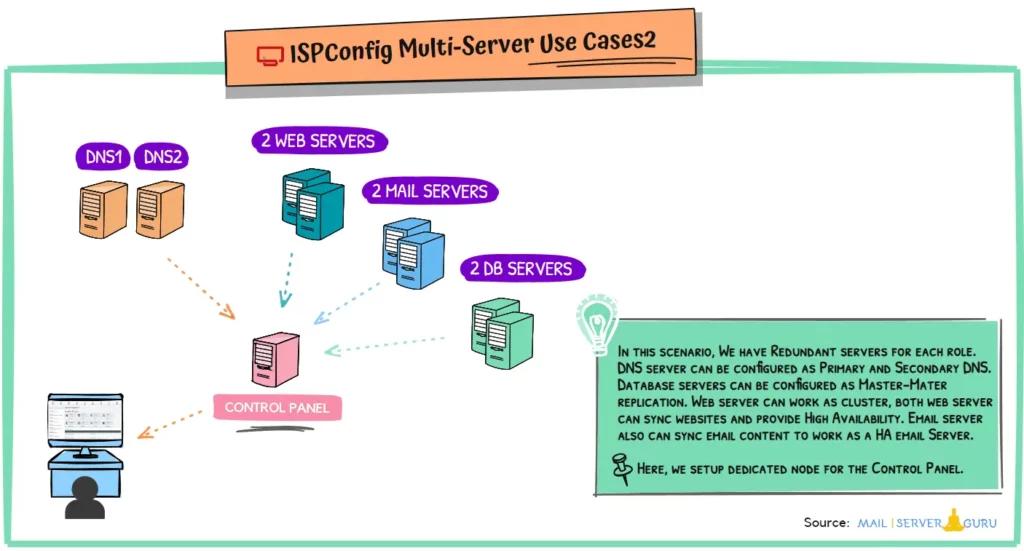
In this scenario, we have redundant servers for each role. We can configure DNS servers as primary and secondary. Database servers can use multi-master replication. Web servers can work as a cluster, syncing websites for high availability. Email servers can also sync emails to another node. A dedicated Control Panel node can manage all servers centrally from a single interface.
We can install multi-server in various flavors:
- Separate servers for each service: Dedicated servers for DNS, Web, Mail, and Databases.
- Redundant servers for high availability: Multiple servers running the same service for load balancing and fault tolerance.
- Mixed service distribution: Some services are grouped on the same server, and others are kept separate. For example, Web and Mail are on one server, and DNS and Databases are on another.
We are not covering the ISPConfig Multi-Server installation in this guide. You can follow this Official Guide from HowtoForge for the Multi-Server setup.

ISPConfig auto-installer Guide
ISPConfig auto-installer is the automated installation script for ISPConfig. It has various command-line options to fine-tune the setup. To see all the supported options, execute the command below.
wget -O - https://get.ispconfig.org | sh -s -- --help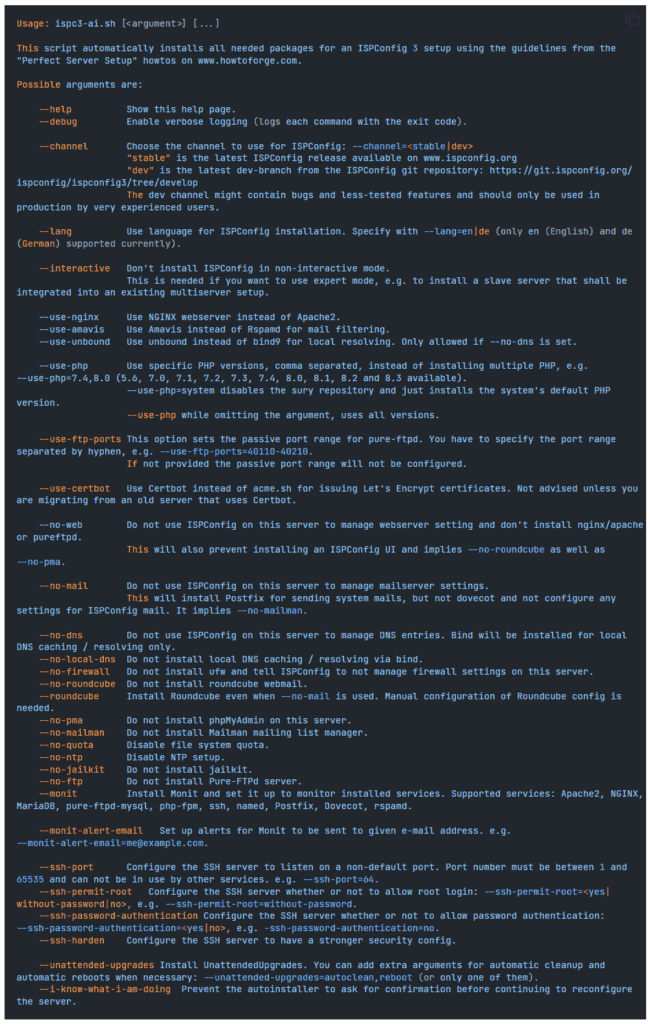
The auto-installer options will be more understandable if we use them separately for the ISPConfig installation. Below, we’ve provided arguments for a complete ISPConfig installation and web and email hosting-only setups.
1. Complete Setup with Auto-Installer
wget -O - https://get.ispconfig.org | sh -s -- --use-ftp-ports=40110-40210 --unattended-upgradesThe above arguments are for the default installation with all the hosting services. ISPConfig command-line options are not for controlling granular package installation; they are targeted to maintain the overall services and functionalities. Required packages will install by default; we can control a few of them; on the above command, we didn’t specifically say to install Apache; it is by default. If we like to use nginx instead of Apache, we can override this with the “–use-nginx” option. In the same way, Jailkit will be installed by default until we specify “–no-jailkit”.
2. Installing for Web Hosting Only
wget -O - https://get.ispconfig.org | sh -s -- --use-ftp-ports=40110-40210 --no-mail --no-roundcube --no-dns --use-unbound --unattended-upgradesThis command and its arguments are for installing the web hosting services only; we are not installing email and DNS services. Also, we don’t need Roundcube in that case. We are installing “unbound” for the local DNS cache; otherwise, “Bind” will be installed.
3. Installing for Email Hosting Only
wget -O - https://get.ispconfig.org | sh -s -- --no-dns --use-unbound --no-ftp --no-pma --unattended-upgradesThere are some exceptions regarding email hosting services. We cannot deny installing the web services because ISPConfig panel, PhpMyAdmin, and Roundcube are all web-based applications that need a web server to run. So we cannot use the “–no-web” option. In that case, we won’t be able to access the WebUI. We are denying installing the DNS, FTP, and phpMyAdmin. These are not mandatory for Email Hosting.
So, ISPConfig’s auto-installer arguments are bundled with the features at a higher level. Until we specify, it will install most of the components. Because some features are dependent on others, and based on our hosting requirements, we have to select the appropriate arguments for the installation.
Now, we are going to install ISPConfig on Ubuntu 24.04 LTS😊. We will perform a complete installation on a single server using the auto-installer.
How to Install ISPConfig on Ubuntu 24.04 LTS
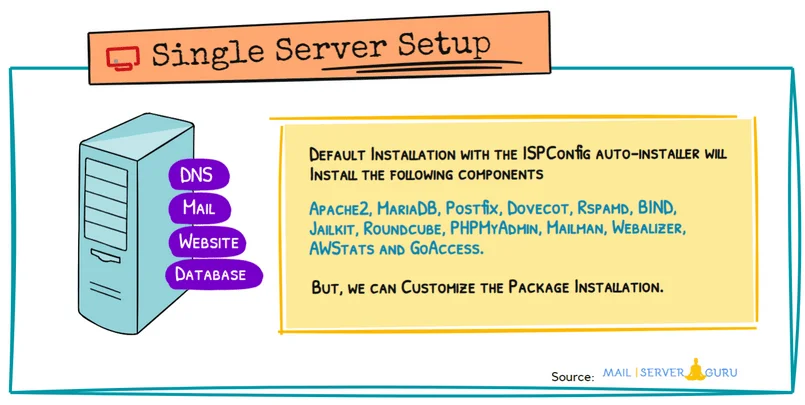
We will run the auto-installer with the options for a complete install. The basic setup includes the following software packages and their dependencies: Apache2, PHP (versions 5.6 – 8.0), MariaDB, Postfix, Dovecot, Rspamd, BIND, Jailkit, Roundcube, PHPMyAdmin, Mailman, Webalizer, AWStats, and GoAccess. By passing arguments to the installer, we can exclude certain functions or install extra services.
Prerequisites
Operating System: Ubuntu 24.04 LTS (also applies to Debian 11, 12 and Ubuntu 22.04)
CPU Architecture: Intel or AMD 64-bit or ARM (ARM64) CPU architecture.
Internet Access: Required for downloading software packages.
System Setup:
- Start with a clean OS installation.
- Do not block any port from the firewall, better disable it during Installation.
- DNS resolution must be functioning correctly.
Step1: Login as Root
Log in as root or run
sudo -sStep2: Configure the hostname and hosts entry
We must configure the server hostname properly and provide a proper entry at the /etc/hostname and /etc/hosts file. The /etc/hostname should only contain the subdomain part, not the full FQDN.
vi /etc/hostname

isp

:x
Provide the /etc/hosts entry properly, otherwise it won’t respond with the FQDN.
127.0.0.1 localhost.localdomain   localhost

# This line should be changed to the correct servername:
202.191.120.10 isp.mailserverguru.com  isp

# The following lines are desirable for IPv6 capable hosts
::1     localhost ip6-localhost ip6-loopback
ff02::1 ip6-allnodes
ff02::2 ip6-allrouters
The “hostname” command will return the subdomain part, and the “hostname -f” command should return the Fully Qualified Domain Name.
root@isp:~# hostname
isp
root@isp:~# hostname -f
isp.mailserverguru.com
root@isp:~#
Step3. Update the system
To update and upgrade to the latest packages, run the command:
apt update && apt upgradeStep4: Run the auto-installer
Auto-installer with the below arguments will install Apache web server and a port range for Passive FTP; unattended upgrades are not mandatory but highly recommended. Run:
wget -O - https://get.ispconfig.org | sh -s -- --use-ftp-ports=40110-40210 --unattended-upgradesIf we want to install Nginx instead of Apache, we must provide the argument “–use-nginx”. The rest of the parameters will remain the same.
wget -O - https://get.ispconfig.org | sh -s -- --use-nginx --use-ftp-ports=40110-40210 --unattended-upgradesAfter executing the above command, it will check and install the required PHP packages, and then it will pop up the message below.

Type “yes” and hit enter. The installer will now start.
When the installer is finished, it will Check all services are running and show you the ISPConfig admin and MySQL root password like this:
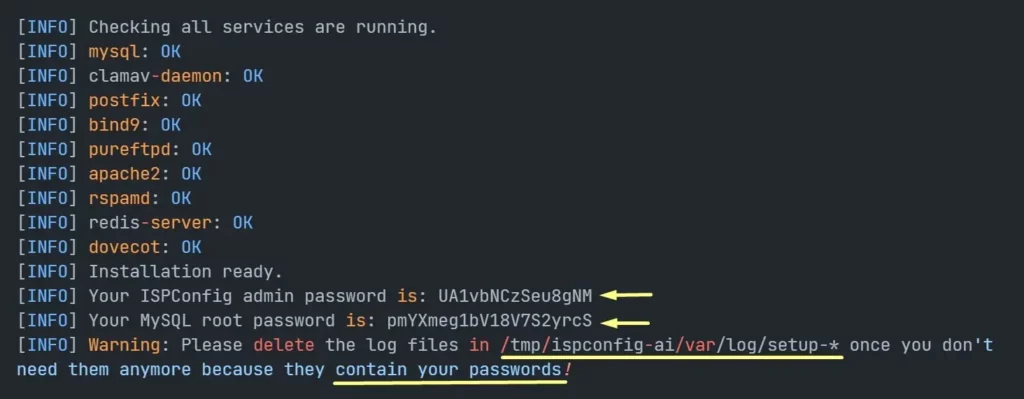
Save the ISPConfig admin password and MySQL root password for later use.
Finally, we can delete the log file /tmp/ispconfig-ai/var/log/setup-*. because it contains the passwords.
rm -rf /tmp/ispconfig-ai/var/log/setup-*Step5: Login to ISPConfig
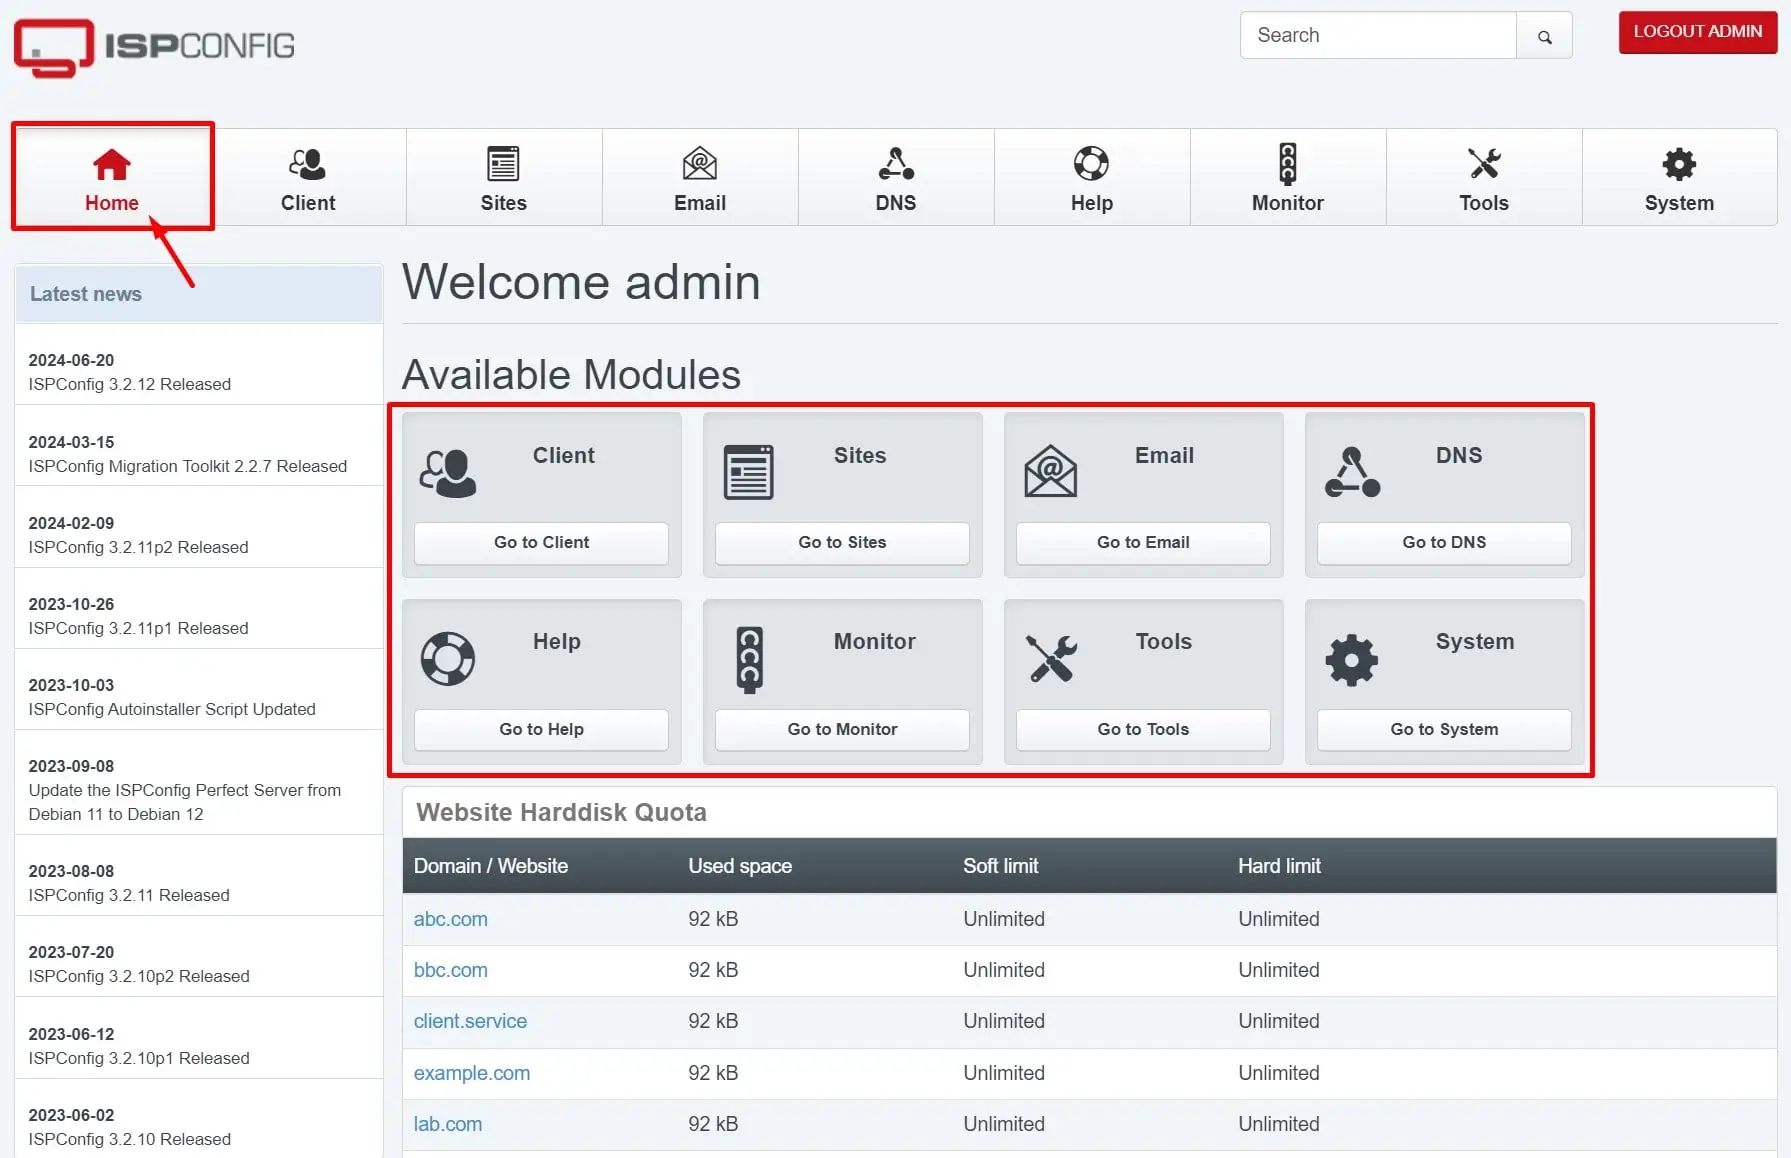
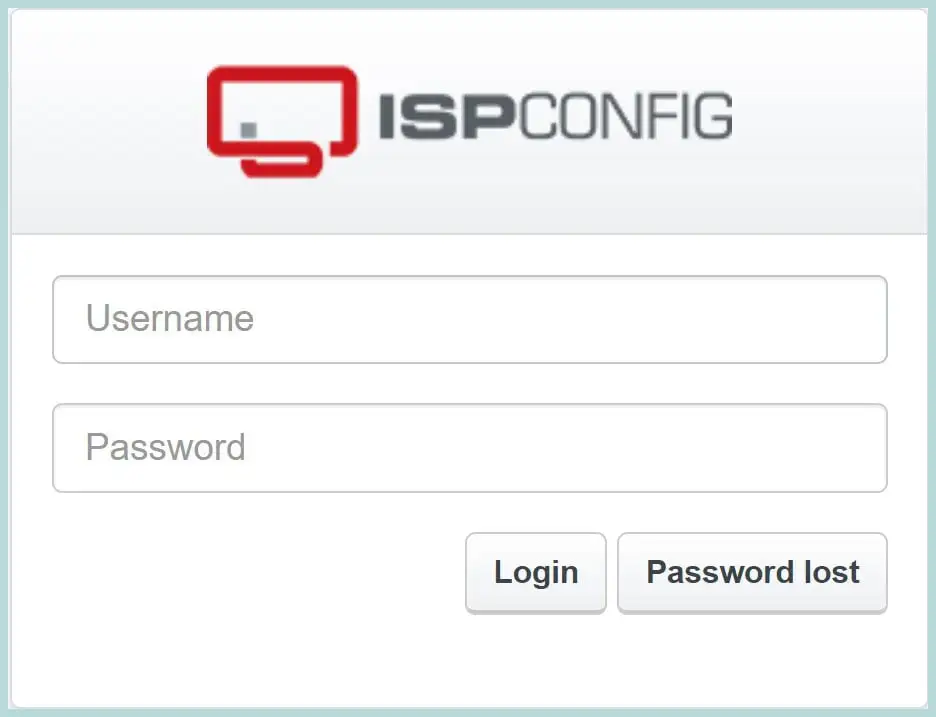
Now, you can access ISPConfig with the URL https://YOUR_FQDN_OR_IP:8080. The ISPConfig Login page will appear. Log in with “Username” as admin and provide the Password you saved from the last output.
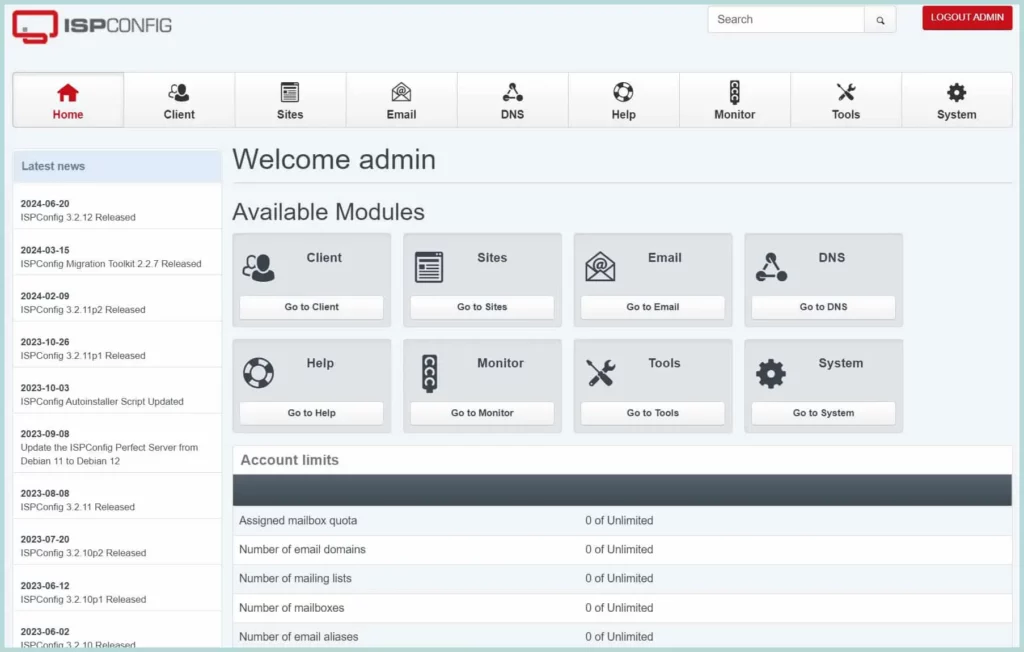
After successful login, the ISPConfig dashboard will appear. You can see more dashboard screenshots at the beginning of this post.
Step6: Post Setup
After the ISPConfig setup, we need to apply some basic security settings, such as changing the default password and enabling the firewall. Both can be done from the ISPConfig dashboard.
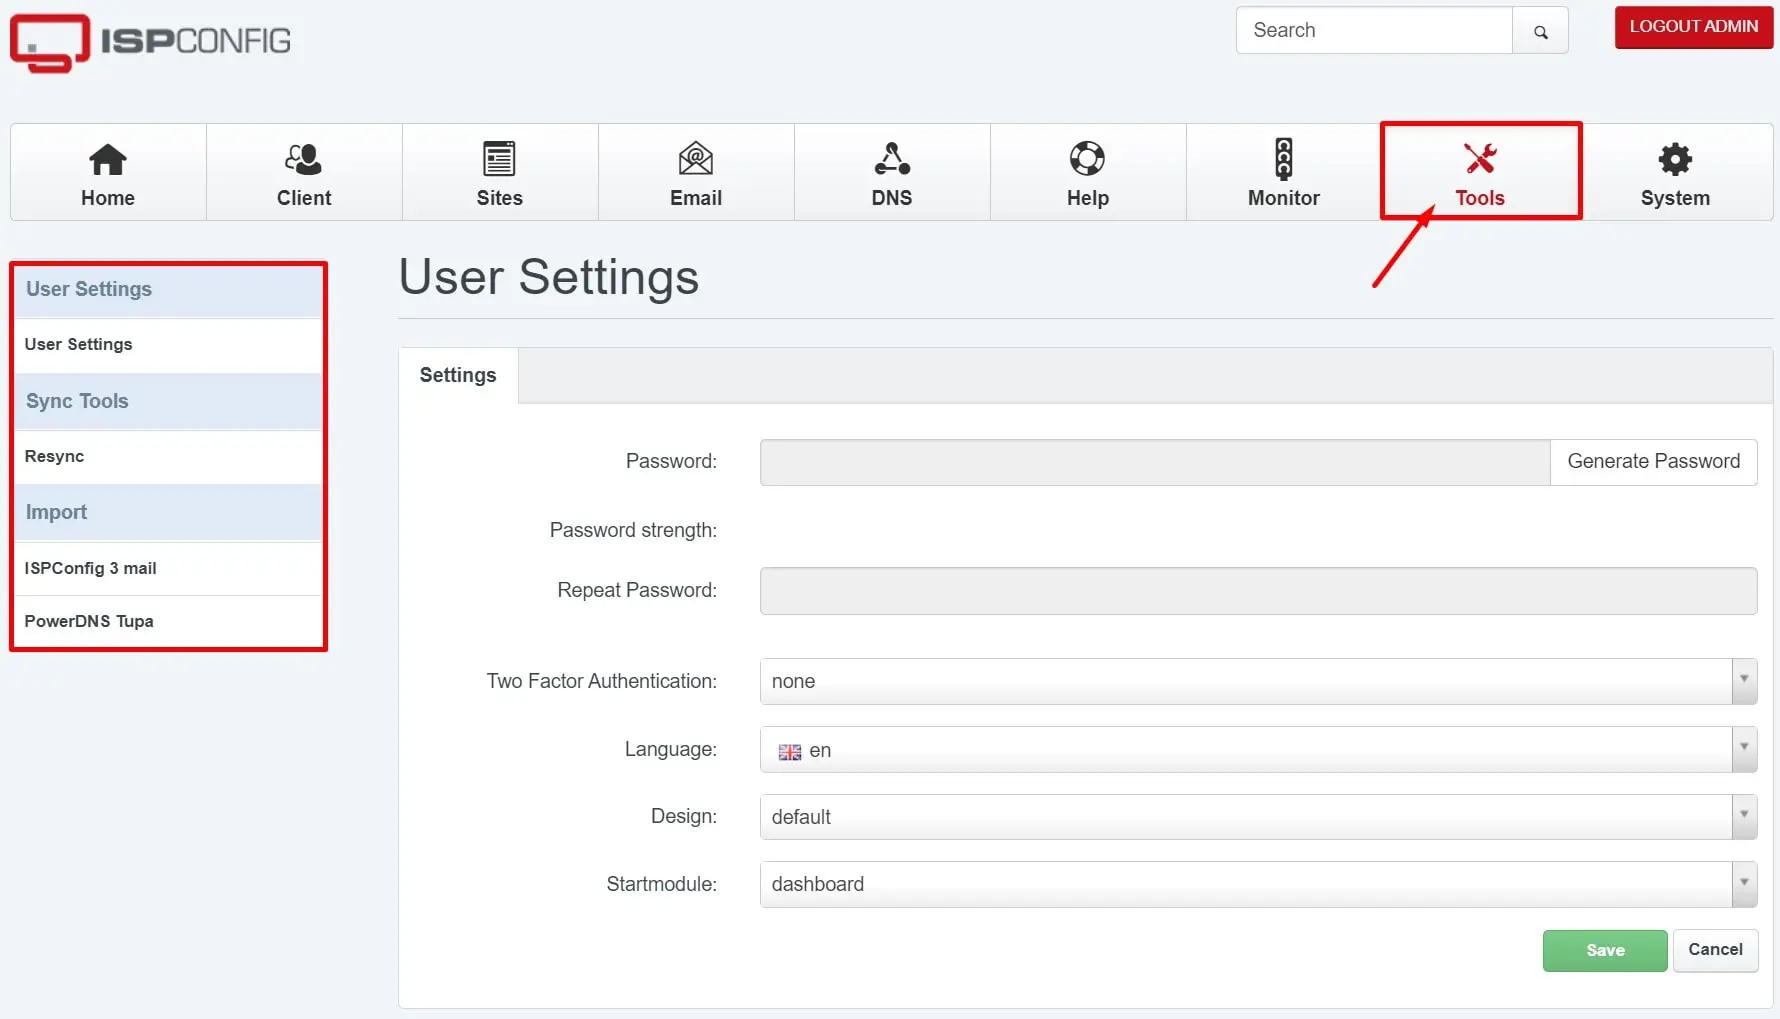
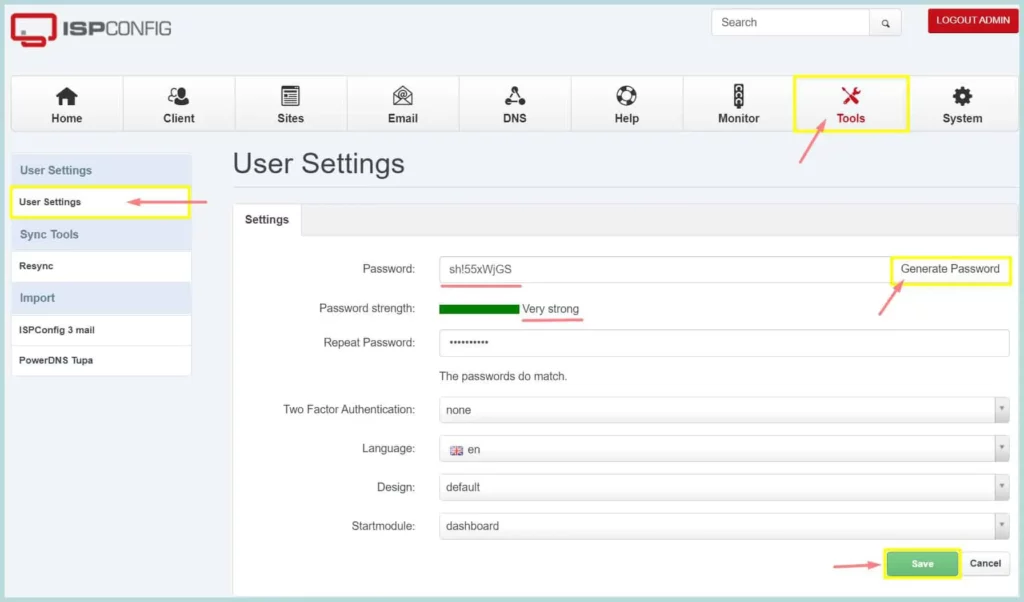
1. Change the Default Password
To secure ISPConfig login, we need to use a strong admin password. Login to the ISPConfig UI, and go to Tools -> User Settings. Then click “Generate Password”. Make sure the “Password Strength” shows “Very Strong”. You can also provide your own strong password. Now, Repeat the same password and click “Save”. You have successfully changed the admin password. To successfully complete this task, please follow the screenshot below.
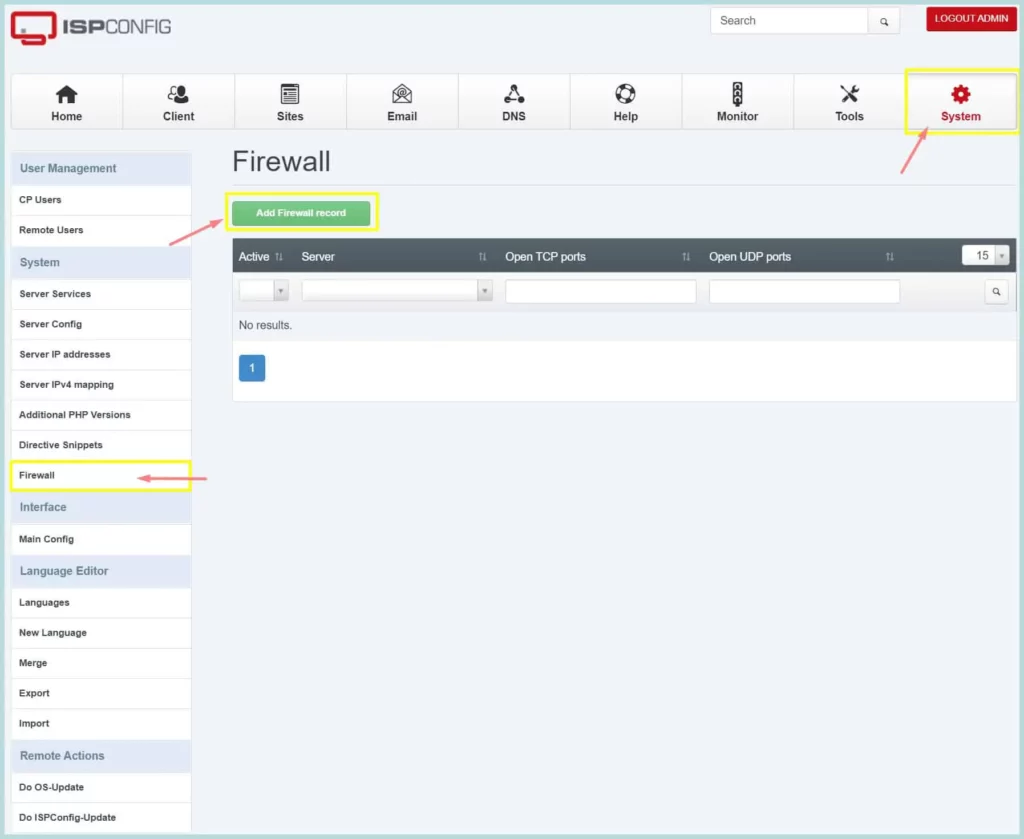
2. Configure ISPConfig Firewall
By default, ISPConfig doesn’t impose a firewall policy. However, we should apply proper firewall rules to any public server; otherwise, systems can be compromised easily. We should configure the recommended firewall policy for ISPConfig.
If you check the system’s firewall from the CLI, you won’t see any rules applied; the UFW firewall is inactive.

To configure the UFW firewall, Go to Systems -> Firewall, then click “Add firewall record”, you can follow the screenshot below.
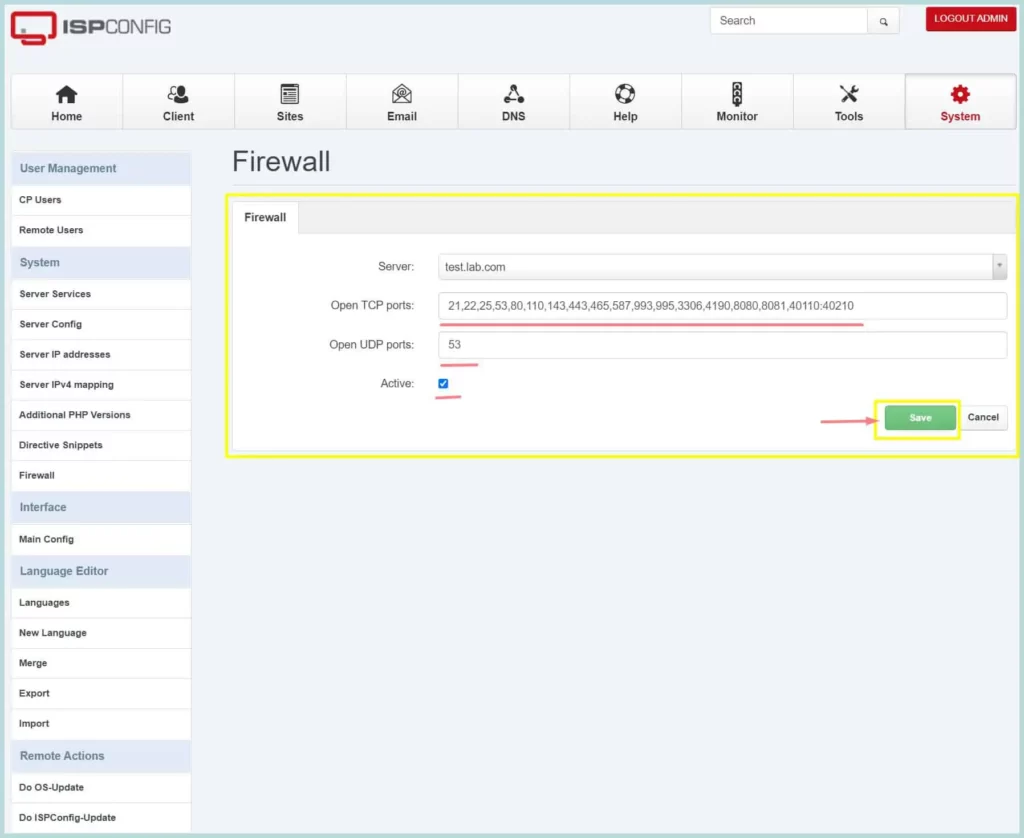
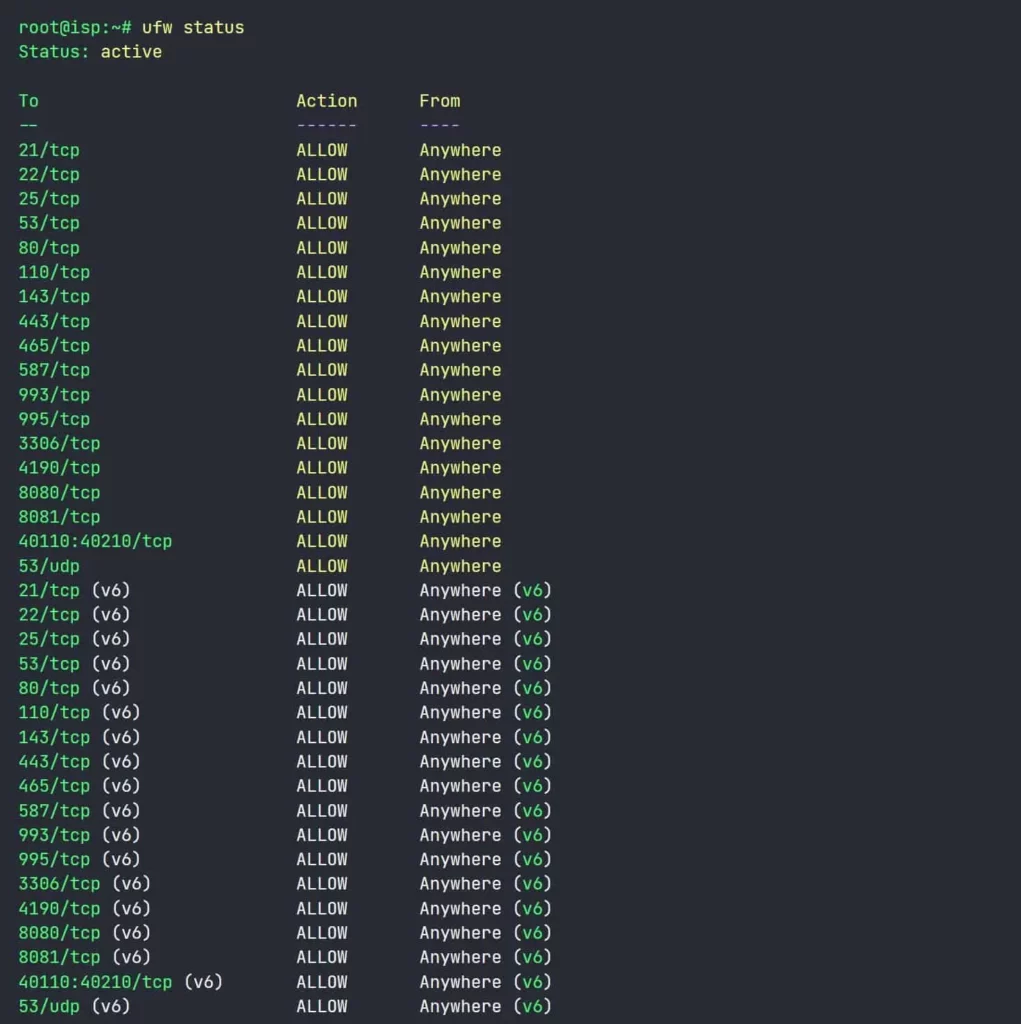
The default firewall rule will open the required ports for the services installed. There are TCP and UDP ports. The allowed ports are 21, 22, 25, 80, 443, 40110-40210, 110, 143, 465, 587, 993, 995, 53, 8080, 8081.
The necessary ports for the services are listed below
- Web: 20, 21, 22, 80, 443 and 40110-40210 (All TCP, no UDP)
- Mail: 25, 110, 143, 465, 587, 993, and 995 (All TCP, no UDP)
- DNS: 53 (TCP and UDP)
- Panel: 8080 and 8081 (All TCP, no UDP)
Now, Click “Save” to apply the firewall rules.
Now, you can check whether the firewall rules are applied to the server. Go to Systems CLI and type “ufw status.” It will show that the rules are applied. Please follow the image below.
this is it—congratulations! You have completed the ISPConfig setup.
Resources and Final Thoughts.
If the installation goes wrong, we can debug the process by adding the “–debug” option to the auto-installer. This will put all debug logs in this file: /tmp/ispconfig-ai/var/log/ispconfig.log. You can run the command below on another shell to see what’s happening during the installation in real time.
tail -f /tmp/ispconfig-ai/var/log/ispconfig.log👉 If you want to explore more about ISPConfig, you can follow this YouTube playlist.
Here, we explained everything with examples and illustrations and provided a step-by-step approach to accomplishing each task. I hope this guide helped you clearly understand how to install ISPConfig on Ubuntu 24.04 LTS.
Now, we want to hear from you
Did we miss anything? Are any of the steps unclear and need further explanation? If you want us to cover any other tutorials, please let us know by leaving a comment below.
Your feedback is very important. It helps us to improve and provide better content.
Thanks👍
ISPConfig Documentation:
ISPConfig is an Open-source community-driven project that has been helping millions of users for over two decades now❤️. It needs our support and cooperation.
🌐 Please help the project 🙏🏻🙏🏻

Hi mailserverguru.com owner, Your posts are always well-supported and evidence-based.
You are most Welcome ❤️
Thank you for the excellent guide. Unfortunately, the Let’s Encrypt certificates are missing. A tutorial on how to obtain valid certificates for different services such as Postfix, Dovecot, etc., would be fantastic.
Best regards,
Dirk
You may want to mention that you need to be logged in as root before you can run the help command:
$ sudo -s
# wget -O – https://get.ispconfig.org | sh -s — –help
I agree, Thanks!!
I had a problem on the firewall (and ufw inactive)
The reason the ufw status command doesn’t show anything useful, even though the documentation might suggest it should, is because the guide mixes up two completely separate systems. ISPConfig uses its own firewall configuration based on iptables, not UFW (which is Ubuntu’s simplified firewall management tool). Unless you manually set up UFW yourself, which is not standard and has now been removed in your case, ISPConfig will not use or reflect anything in UFW.
So when you run ufw status and see “Status: inactive,” that’s actually correct and expected — it just means UFW isn’t being used, which is fine.
To check whether the firewall rules applied through ISPConfig are actually active, you should use the iptables command instead. That will show you all currently active firewall rules on the server. For example, if you added rules for ports like 22, 80, and 443 via ISPConfig, they will appear in the iptables output as accepted TCP ports. This confirms the rules are in place, even if UFW reports nothing.
In summary, don’t rely on ufw status when using ISPConfig. Use iptables -L -n to verify your firewall configuration instead.