
In this guide, I have explained how to Install iTop on Ubuntu 22.04. We are going to install the major stable version of iTop 3.1 on Ubuntu 22.04 LTS.
This is a step-by-step guide for Installing iTop (IT Operations Portal) an ITIL-compliant, open-source, web-based IT service management platform.
If you want to follow the previous iTop Installation guide on Ubuntu 16.04 you can visit the link or for the latest iTop Installation tutorial on Ubuntu 24.04 you can check this Link as wel.

This video guide will help you to follow the instructions properly and complete the setup.
Step1: Update The System
It is always recommended to update and Upgrade the system before the Installation.
apt update -y && apt upgrade -yStep2: Install Apache and PHP Modules
We need to install Apache and the required PHP Modules for iTop. We will run iTop from the default Apache root directory. We do not want to access iTop by mentioning http://example.com/itop on the URL; we will directly access it with the hostname.
1. Install Apache2.
apt install apache2 -y2. Install Required PHP Modules for iTop.
apt install php8.1 php8.1-mysql php8.1-ldap php8.1-cli php8.1-soap \
php8.1-xml php8.1-gd php8.1-zip php8.1-mbstring php8.1-curl graphviz \
acl unzip -y
3. Configure iTop default Root directory, Provide the below <directory> options to the default virtual host configuration. virtual host configuration will look this:
vi /etc/apache2/sites-enabled/000-default.conf

<VirtualHost *:80>

	ServerAdmin webmaster@localhost
	DocumentRoot /var/www/html/

	<Directory /var/www/html>
          Options Indexes FollowSymLinks
          AllowOverride All
          Require all granted
	</Directory>

	ErrorLog ${APACHE_LOG_DIR}/error.log
	CustomLog ${APACHE_LOG_DIR}/access.log combined

</VirtualHost>

:x // save the configuration
4. Remove the default index.html from /var/www/html
rm -rf /var/www/html/index.html5. Now, Restart Apache.
systemctl restart apache2
Step3: Configure PHP-FPM
When you install iTop on Ubuntu 22.04, using PHP-FPM is recommended for optimal performance. PHP-FPM enhances PHP’s performance by managing pools of PHP worker processes, ensuring efficient and fast execution of PHP scripts. We will install and configure PHP-FPM, and instruct Apache to use PHP-FPM for PHP file processing.
1. Install PHP-FPM
apt install php8.1-fpm -y2. Check the status of PHP-FPM. It must be running and a socket must be created.
service php8.1-fpm status
ls -la /var/run/php/php8.1-fpm.sock
3. Disable mod_php and prefork module
a2dismod php8.1
a2dismod mpm_prefork
4. Enable PHP Modules and PHP-FPM Configuration on Apache.
a2enmod mpm_event proxy_fcgi setenvif
a2enconf php8.1-fpm
5. Restart Apache and PHP-FPM
systemctl restart apache2
service php8.1-fpm restart
6. Configure Apache to use PHP-FPM. we need to provide this <FilesMatch> directive under the virtual host configuration to instruct Apache to use PHP-FPM for PHP file processing. the final virtual host configuration will look like this:
vi /etc/apache2/sites-enabled/000-default.conf

<VirtualHost *:80>

	ServerAdmin webmaster@localhost
	DocumentRoot /var/www/html/

	<Directory /var/www/html>
          Options Indexes FollowSymLinks
          AllowOverride All
          Require all granted
	</Directory>

	<FilesMatch ".php$">
          SetHandler "proxy:unix:/var/run/php/php8.1-fpm.sock|fcgi://localhost/"
	</FilesMatch>

	ErrorLog ${APACHE_LOG_DIR}/error.log
	CustomLog ${APACHE_LOG_DIR}/access.log combined

</VirtualHost>

:x // save the configuration
7. Restart Apache again.
systemctl restart apache28. In order to to safely upload and store documents, We need to change some recommended PHP settings in the php.ini file. The details of the requirement are on this Official Page.
- Edit /etc/php/8.1/fpm/php.ini and provide these new values.
max_input_vars = 5000
max_execution_time = 300
file_uploads = On
upload_max_filesize = 64M
max_file_uploads = 20
post_max_size = 80M
memory_limit = 512M
max_input_time = 180
upload_tmp_dir = /tmp9. Restart PHP-FPM again.
service php8.1-fpm restartStep4: Install and Configure APCu
APCu significantly enhances the performance of the iTop server. It speeds up PHP applications by caching opcodes and internal structures in shared memory, reducing repeated parsing of PHP scripts. When you install iTop on Ubuntu 22.04, it is recommended that you use APCu with Apache. Configuring APCu involves installing the extension and adjusting settings for adequate memory allocation.
1. Install APCu
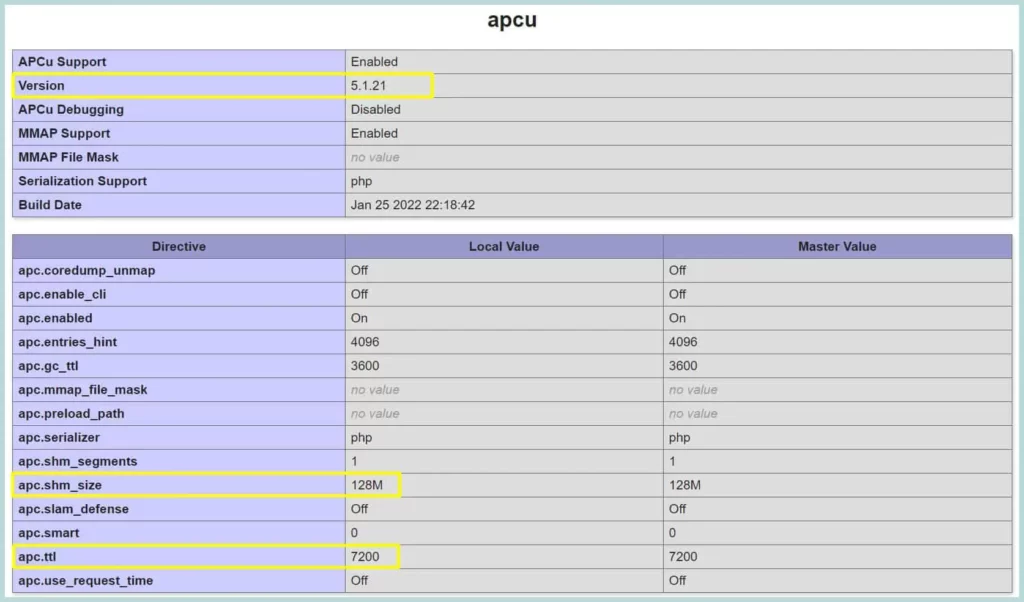
apt install php8.1-apcu2. Configure the Shared memory and TTL time.
vi /etc/php/8.1/fpm/conf.d/20-apcu.ini

extension=apcu.so
apc.shm_size=128M
apc.ttl=7200

:x
3. Restart PHP-FPM
systemctl restart php8.1-fpm⚠️ Check the APCu version, there is a warning on the official page about the APCu v5.1.12. We have installed v5.1.21 which is ok.
Step5: Install and Configure MariaDB
iTop needs a database, we can use either MySQL or MariaDB database. iTop stores all the application’s data, including information about IT assets, configurations, users, tickets, changes, and other operational data in the database. iTop can handle large amounts of data and complex queries effectively.
1. Install MariaDB and check version.
apt install mariadb-server -y
root@itop:~# mariadb -V
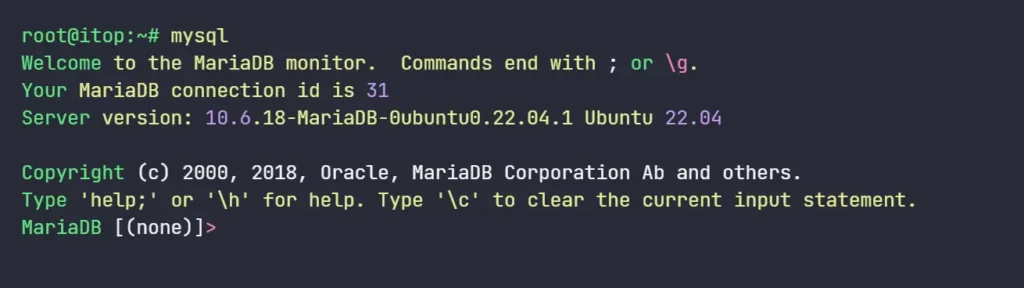
mariadb Ver 15.1 Distrib 10.6.18-MariaDB, for debian-linux-gnu (x86_64)2. Login to MariaDB, just execute “mysql” command. It will Login without asking password.
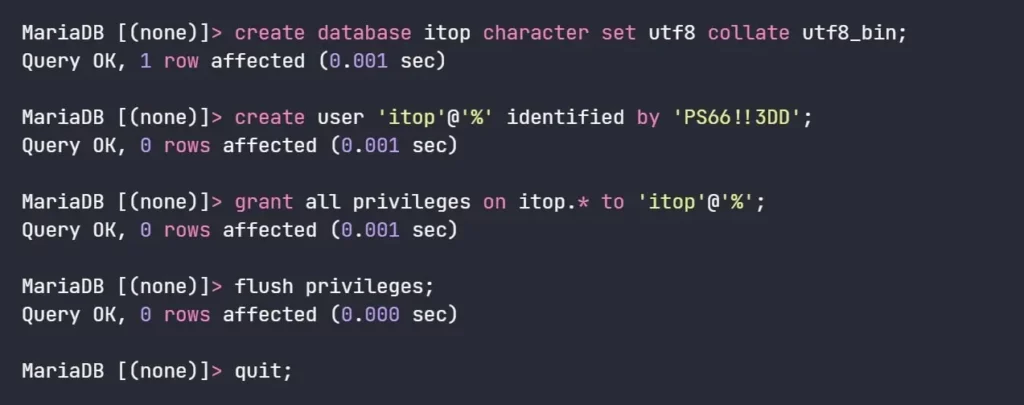
3. Create iTop Database and User and assign full privileges to the User. copy the below SQL Statements and execute them on the MariaDB prompt. you can copy them all and paste them at once.
create database itop character set utf8 collate utf8_bin;
create user 'itop'@'%' identified by 'PS66!!3DD';
grant all privileges on itop.* to 'itop'@'%';
flush privileges;
quit;
Successful execution will show “Query OK”
4. Now, we need to change some MariaDB settings for better performance. You can find the details here on the official page. We will apply the new settings in this location: /etc/mysql/mariadb.conf.d/50-server.cnf.
vi /etc/mysql/mariadb.conf.d/50-server.cnf

[mysqld]
max_allowed_packet = 80M
innodb_buffer_pool_size = 512M
query_cache_size = 32M
query_cache_limit = 1M

:x // save the file
5. Now Restart the MariaDB service
systemctl restart mariadb.serviceStep6: Download and Setup iTop Directories
Now, we will download iTop from SourceForge, and prepare the directories to install. we are applying ACL on the directories. ACLs enhance security by ensuring only the www-data (Apache user) user has the required permissions to interact with the application data and logs to reduce the risk of unauthorized access to the directories.
1. Download iTop-3.1.1-1-12561
cd /tmp/
wget https://sourceforge.net/projects/itop/files/itop/3.1.1-1/iTop-3.1.1-1-12561.zip
2. Unzip in the Apache’s Document root directory.
unzip /tmp/iTop-3.1.1-1-12561.zip "web/*" -d /var/www/html/
mv /var/www/html/web/*  /var/www/html/
rmdir /var/www/html/web
3. Apply ACL on the data and log directory
setfacl -dR -m u:"www-data":rwX /var/www/html/data /var/www/html/log
setfacl -R -m u:"www-data":rwX /var/www/html/data /var/www/html/log
4. Create directories for the installation files and apply Apache user permissions.
cd /var/www/html
mkdir env-production env-production-build
chown www-data: conf env-production env-production-build
Step7: Run the iTop Installation wizard
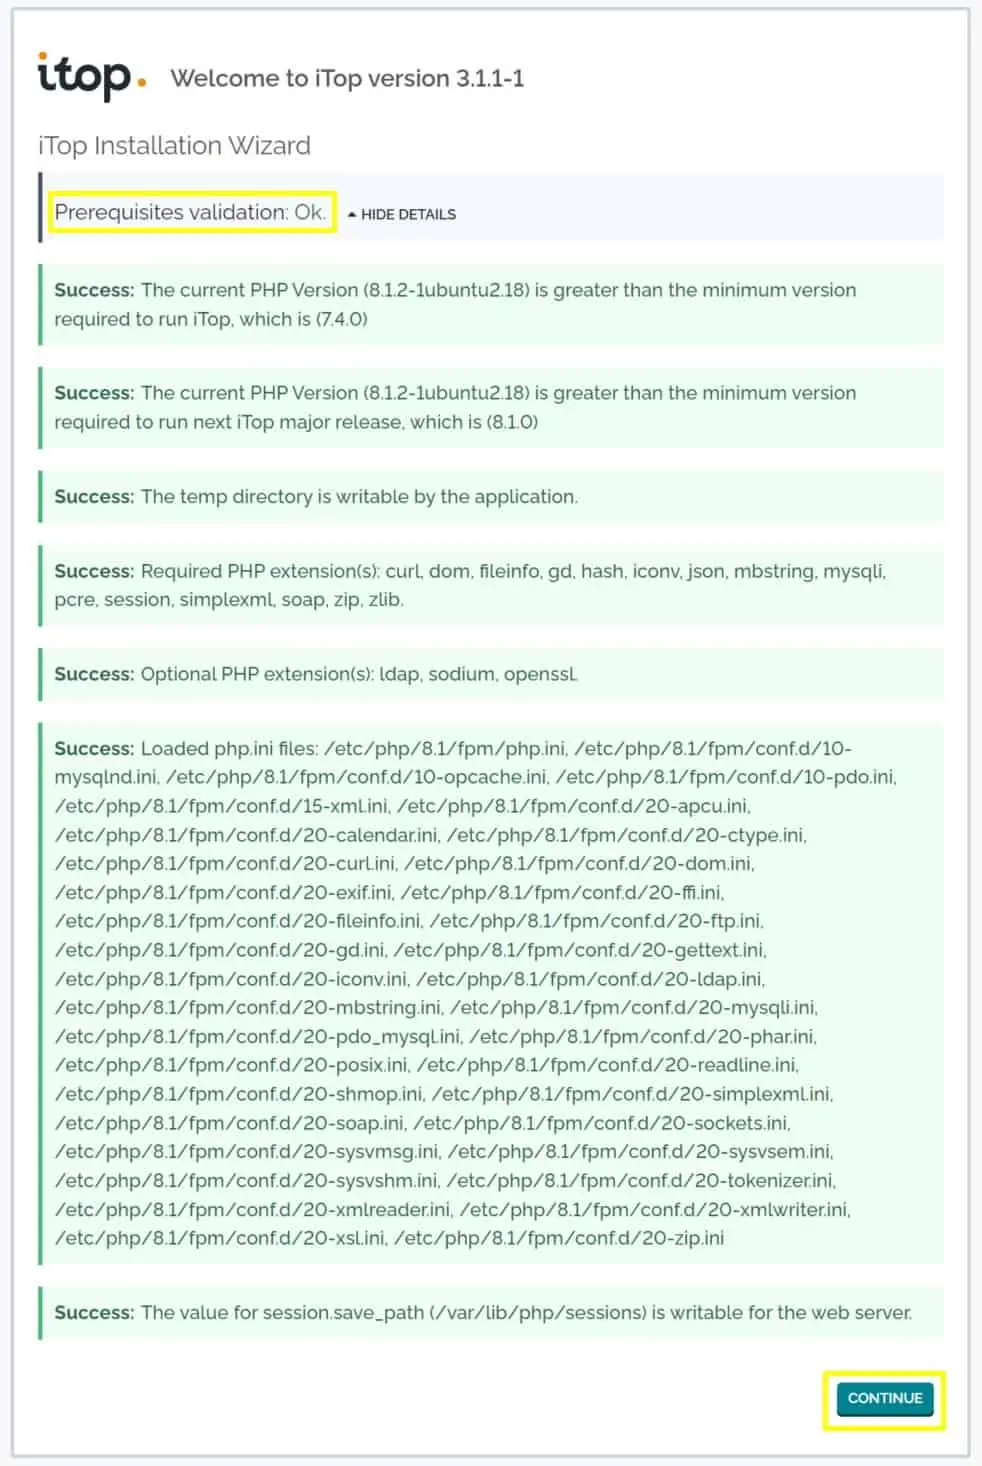
Now, the rest of the installation will be from the browser. we will launch the installation by pointing to this URL: http://yourdomain.com/setup and follow the wizard.
1. This is the first page of the iTop Installation wizard, it shows the “Prerequisites validation: OK” if we click the “Show Details”, it will show the detailed checks, all the prerequisites are met, and shows the message “Success” highlighted with a green text background.
Click “Continue”
2. Select whether you want to “Install a new iTop” or want to Upgrade an existing one. we are selecting to create a new iTop Instance.
Click “Next”

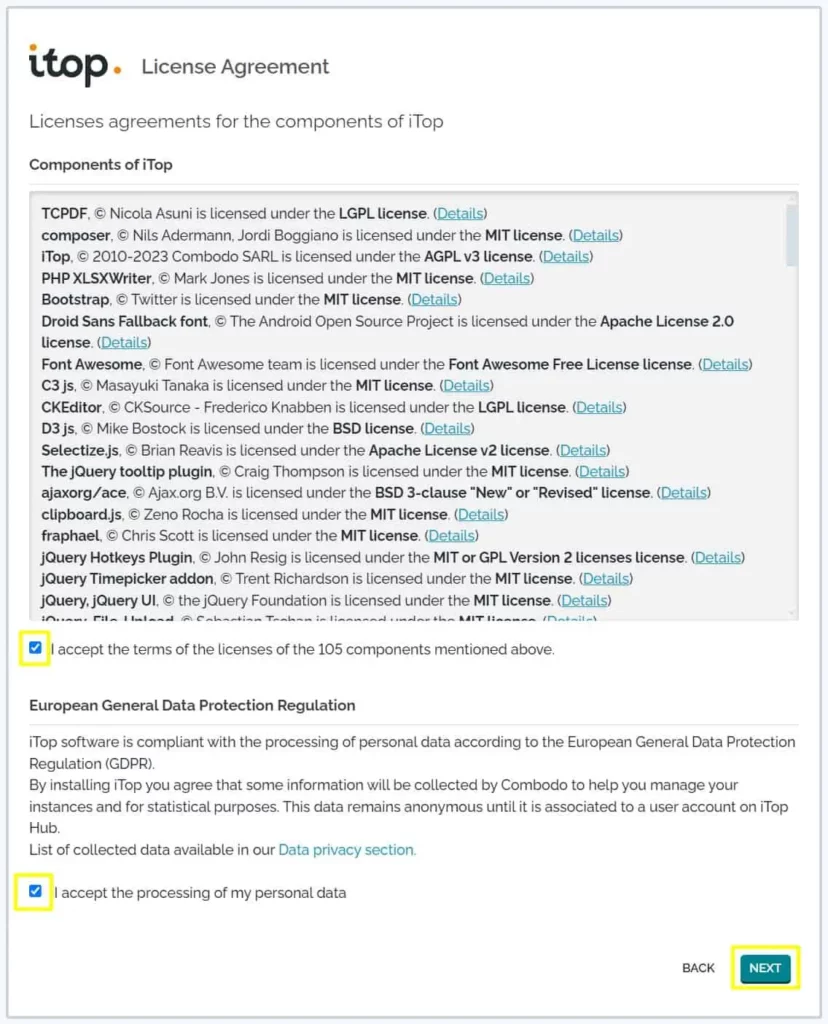
3. We must agree on the iTop License Agreement, and tick both check boxes.
Click “Next”
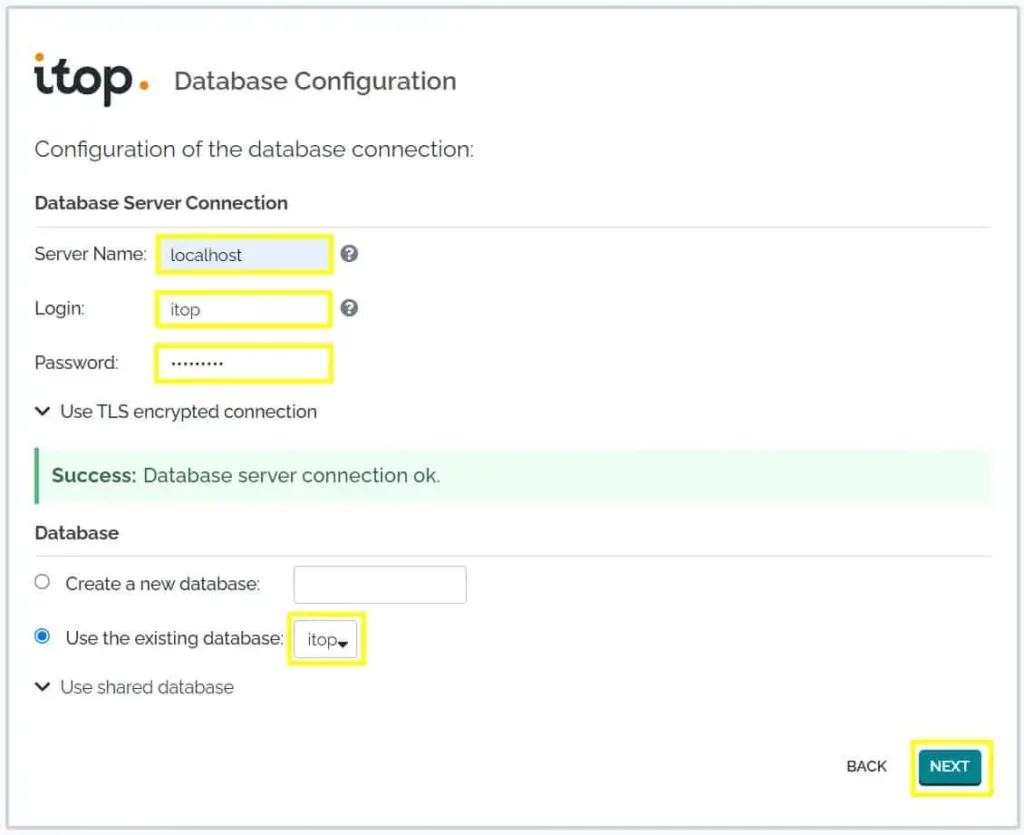
4. Now, configure the iTop database, and provide the database user and password you created earlier on the MariaDB prompt. Select the “use the existing database” option and select the database from the dropdown box.
Click “Next”
5. Define the iTop administrator account, and confirm the password.
Click “Next”

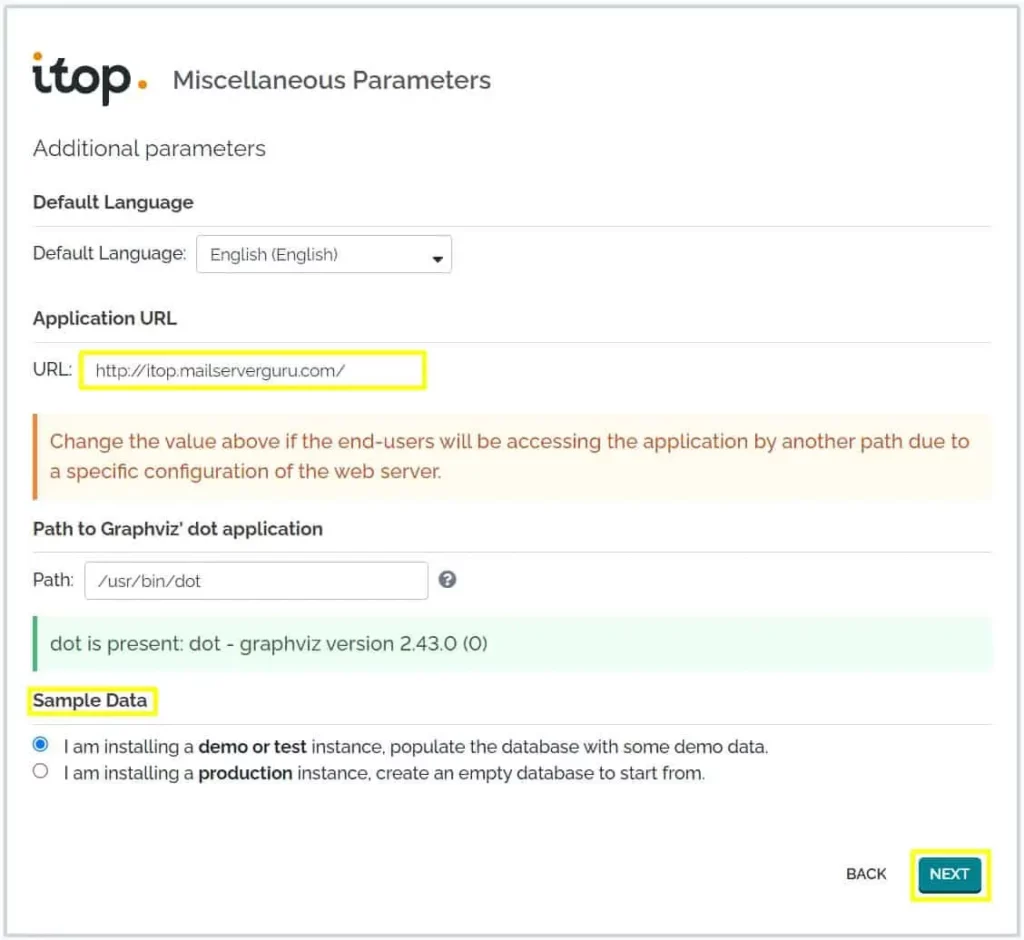
6. We can change the application URL on this page if needed. and we can select either this installation for demo purposes or a production setup, demo setup will get sample data.
Click “Next”
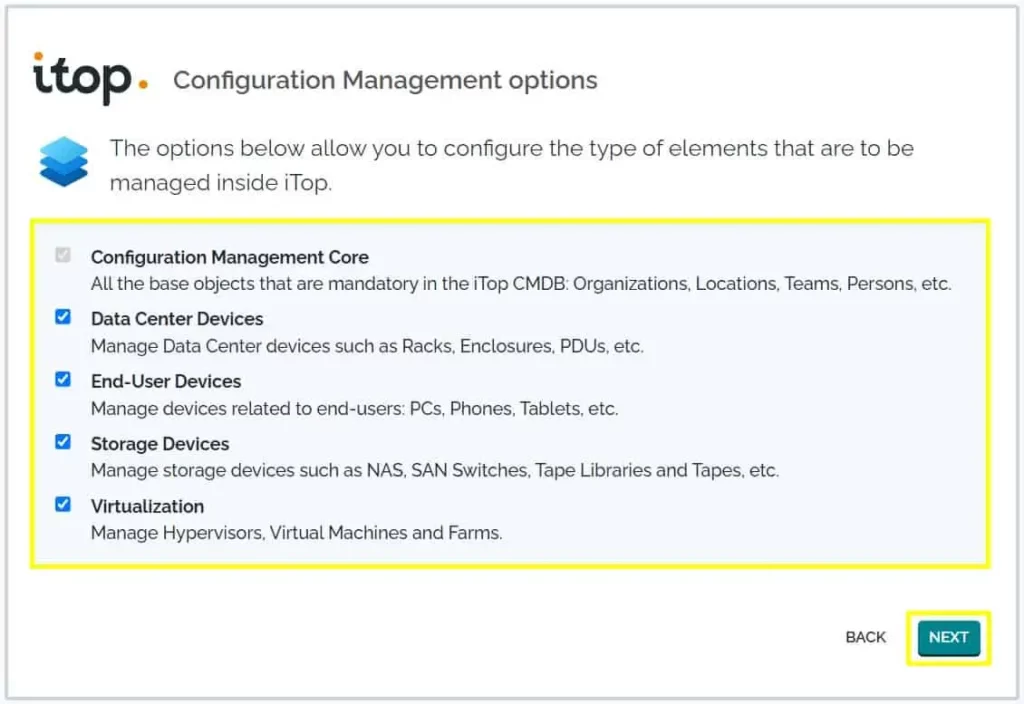
7. Select the device types you want to manage in the iTop.
Click “Next”
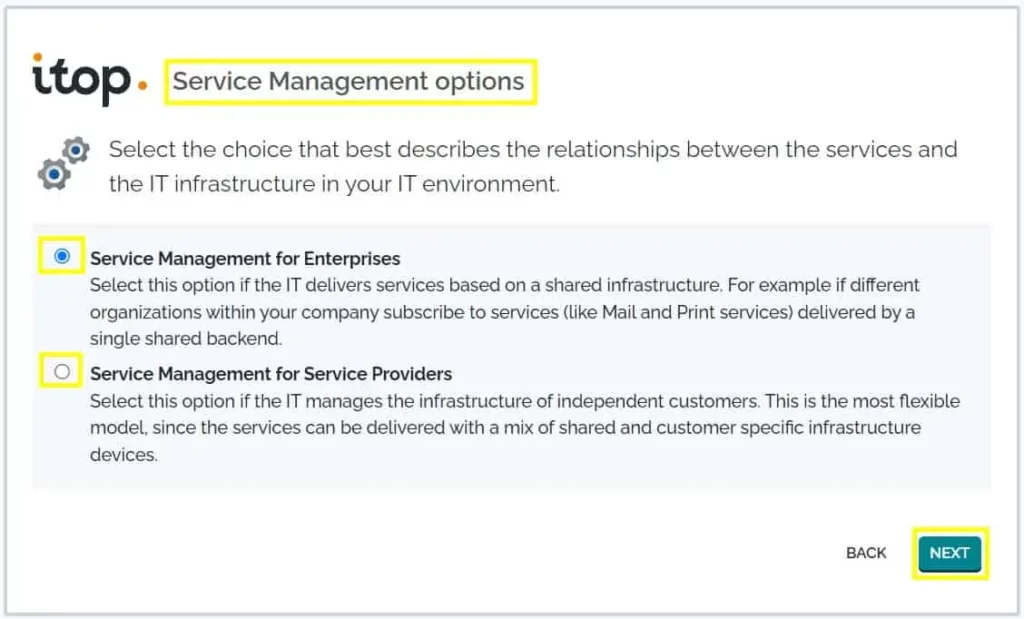
8. Select the service management Options, if you want to use iTop among different organizations within your company, select the 1st one “Service management for Enterprises” Or, if your customers belong to a different company select the “Service Provider” Option.
Click “Next”
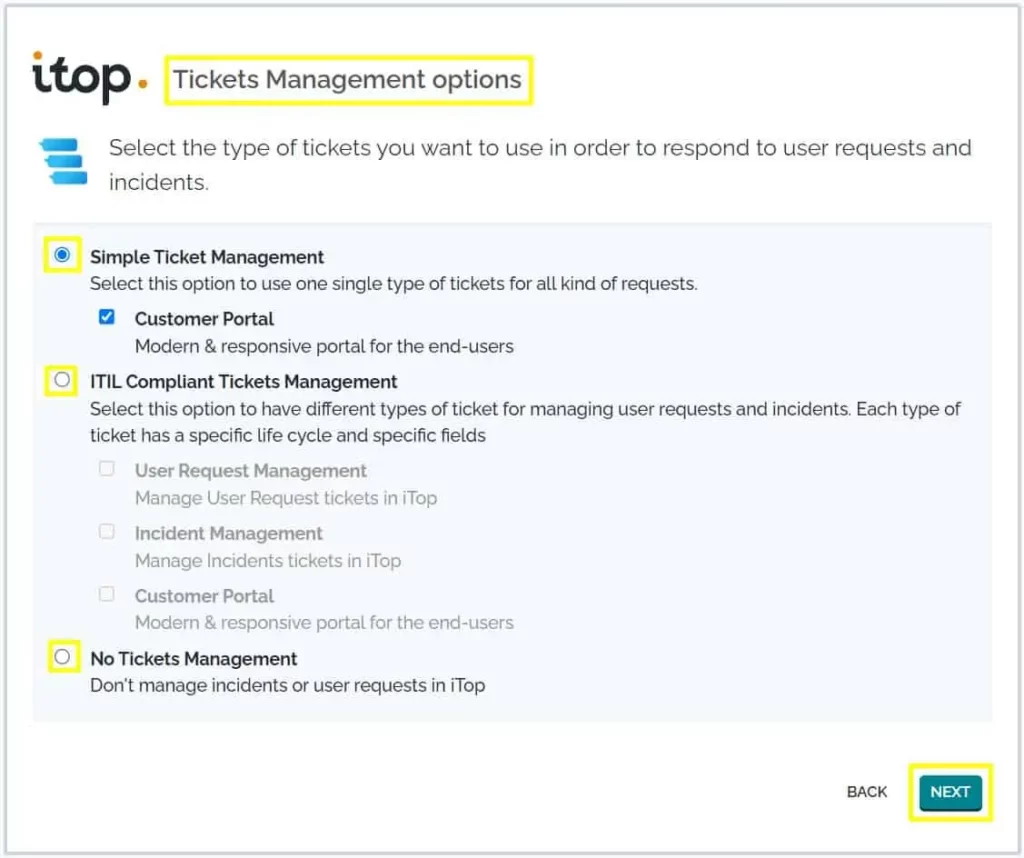
9. Select the type of Tickets you want, Simple Ticket Management or ITIL Compliant Tickets Management.
Click “Next”
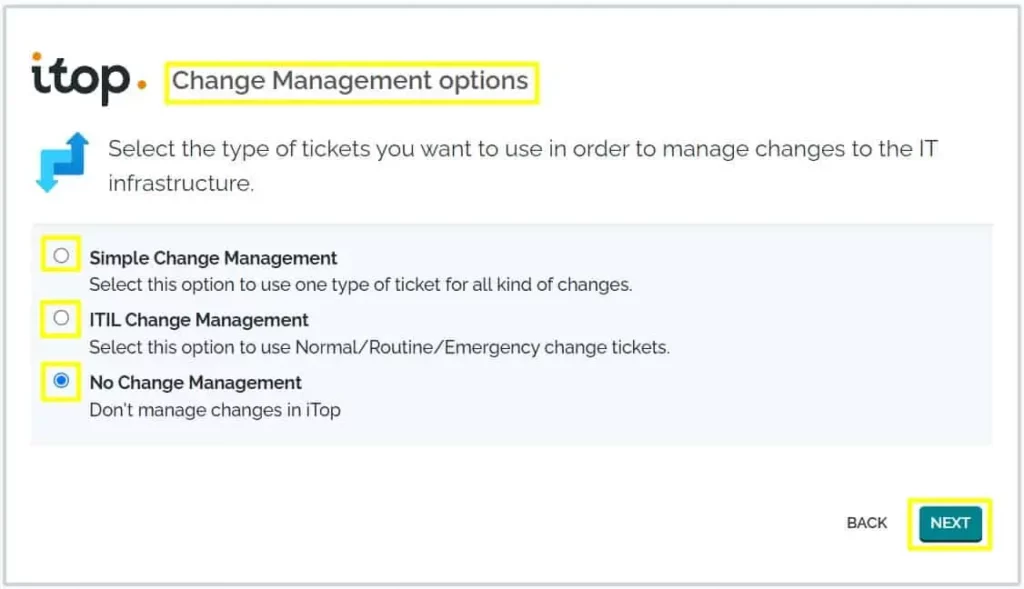
10. Select the type of Tickets you want, to manage Change management issues.
Click “Next”
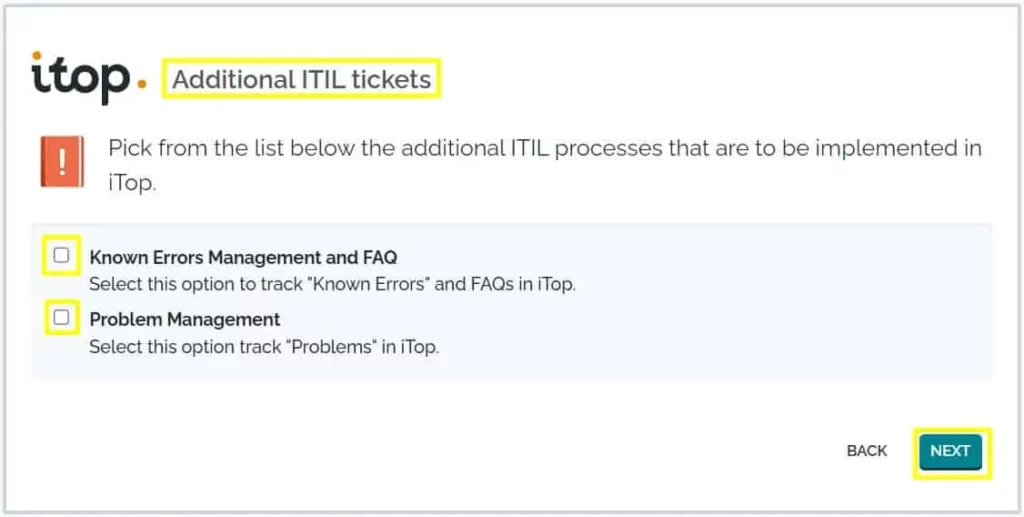
11. Select the options if you want to manage “known errors and FAQs” and Problems in the iTop.
Click “Next”
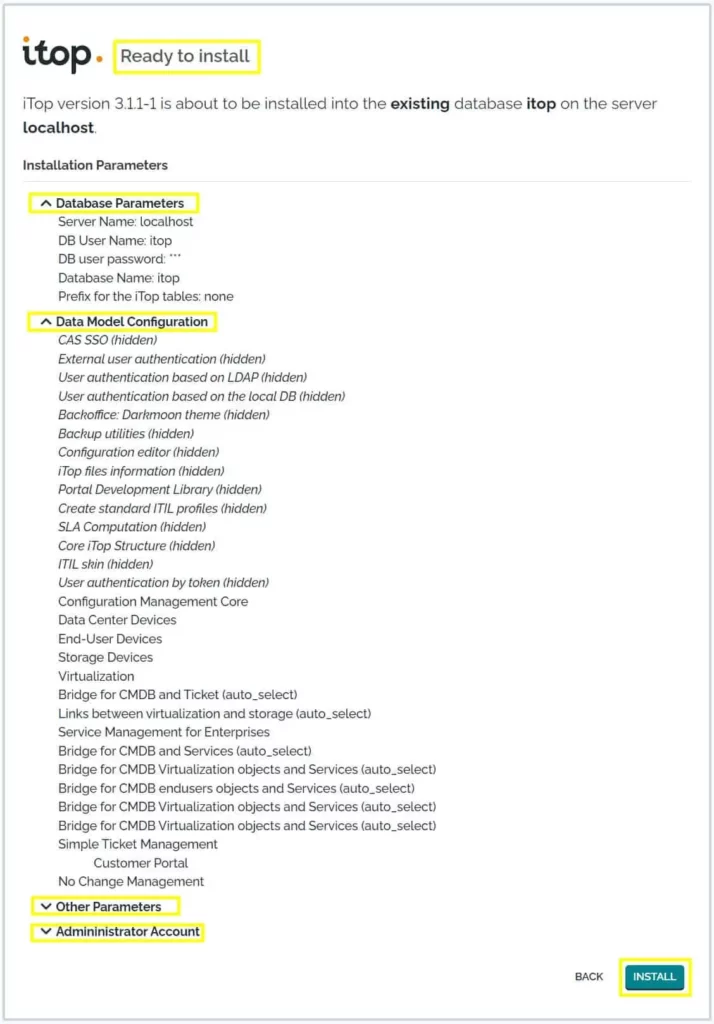
12. These are the summary of our selection, Now the iTop is ready to be installed. We can check what options we choose, we can go back and change if necessary.
Click “INSTALL”
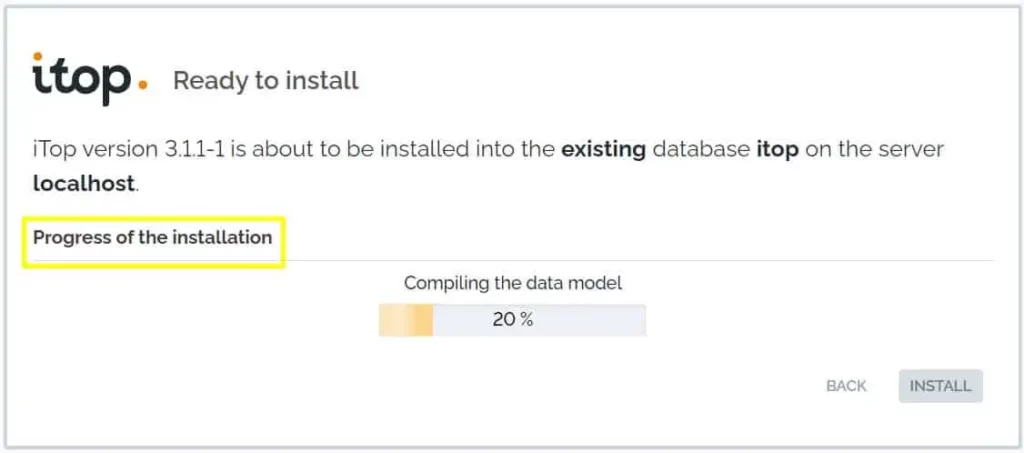
13. iTop Installations begins and shows the progress.
Click “Next”
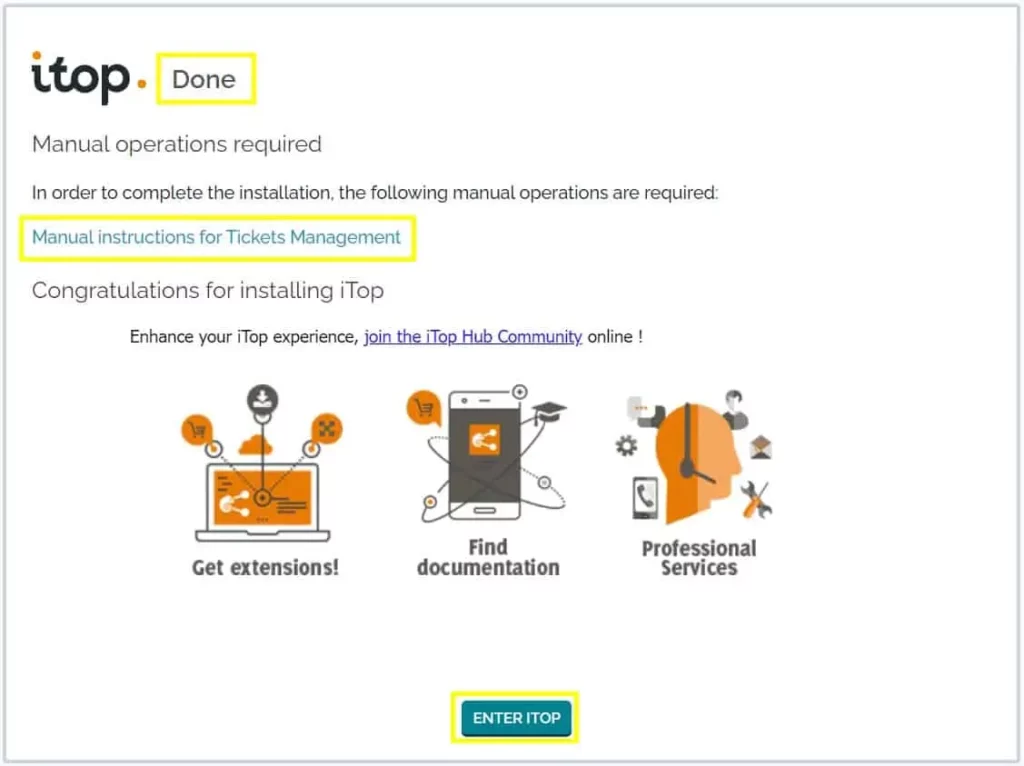
14. iTop installation is Done !! We are ready to enter iTop. we have some manual instructions for Ticket Management, we can click the link to visit the page, and we can also click on the image to visit the extensions and documentation.
Click “Enter iTop”
15. We have successfully logged in and landed on the iTop dashboard.
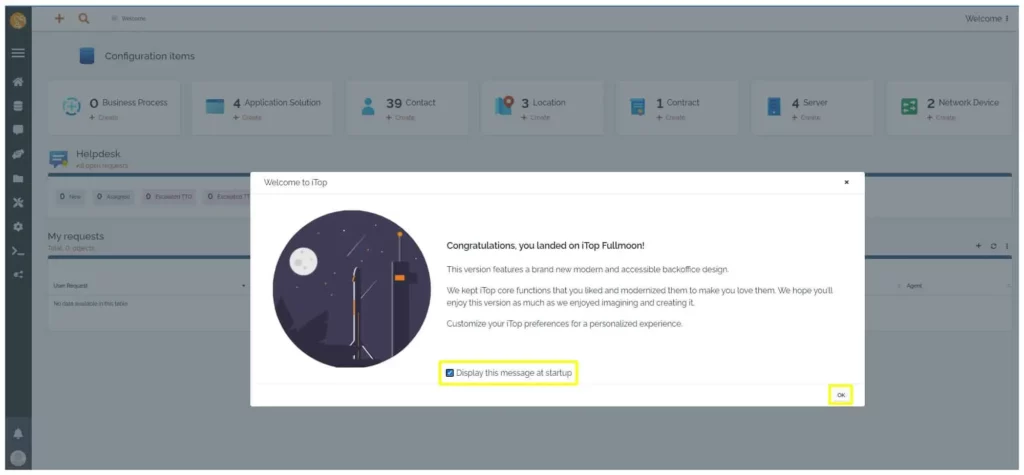
So, this is it for today !! We have successfully installed iTop on Ubuntu 22.04 LTS.
Now It’s Your Turn
I have tried to explain in step-by-step instructions, how to Install iTop on Ubuntu 22.04 LTS. I hope this guide will help you to Install iTop successfully.
If you want to learn more about iTop configuration you can visit this youtube playlist.
Thanks.


Please setup feature itop step by step on itop 3.2.xx, maybe for :
ldap integration
email
services
approval
workplan
sla
I will try my best, Thanks !!