This is a SUPER detailed Linux DNS Server Configuration tutorial for 2025.
In this tutorial you’ll learn, step-by-step, how to:
- Install and Configure Linux DNS Server
- Understand How DNS Server works
- Advanced Configuration Guideline
- Troubleshoot and Test DNS Servers
DNS servers play a crucial role in the internet ecosystem, and Linux is the primary choice for heavy-duty DNS deployments. Different types of DNS Servers serve different purposes.
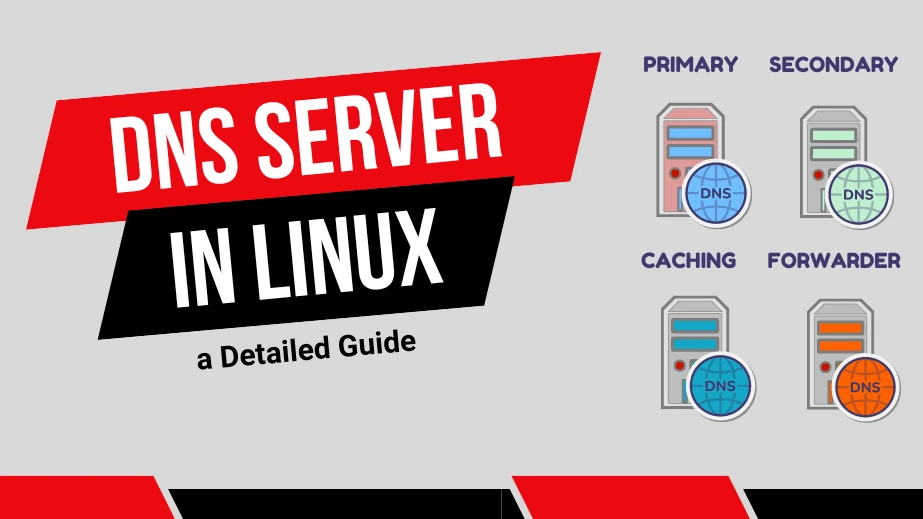
In this article, we will learn How to Install and Configure Linux DNS Server. We will focus on four main types: Primary, Secondary, Caching-only and Forwarder DNS. Each of these will be explained in detail with scenarios, diagrams and practical use cases.
Ready? Let’s dive into this comprehensive Linux DNS server setup guide!
Contents
Types of DNS Servers in Linux
In Linux, DNS administration typically involves four main types of DNS servers:
Primary/Master DNS Server: A DNS server is referred to as “Primary” when it holds the authoritative records for a domain. It is responsible to provide definitive answers for that domain. It is the main server which provides DNS records to other DNS servers or clients.
Secondary/Slave DNS Server: A Secondary DNS server is defined by the zone declaration. This type of DNS server isn’t necessarily dedicated, but it can be. You can assign master and slave zones to different servers. The server hosting the slave zone is considered the Secondary DNS server, which syncs DNS records from the Primary.

Caching-Only DNS Server: A Caching-Only DNS server doesn’t host any zones. It’s primary function is to communicate with other DNS servers on the internet, to retrieve DNS records and stores them in it’s cache, it always serves responses to clients from it’s cache. This reduces the need to query external servers for repeated queries, thus improves the response time.
Forwarder DNS Server: This type of server forwards all DNS queries (when it doesn’t know the answer) to another designated DNS server, often a parent server. It then caches the responses like a Caching-Only server, speeding up future queries. The key difference is that its primary function is forwarding queries.
How DNS Server Works
Let’s explore how DNS server works from a practical standpoint:
Generally, DNS server works in a distributed manner, each server performs it’s own role.
The illustration below shows, how the four types of DNS servers communicate with one another for name resolution.
This scenario will clarify the unique roles and objectives of each server, whether they operate independently or coexist with other DNS servers on the same network.
Here, the 1st Server (Caching-only) sits at the corporate level, handling all DNS requests from client devices. It answers queries from its cache. If the answer isn’t in its cache, the server will query external DNS servers on the internet to fetch the response.
If the caching server is configured as a Forwarding DNS, it will forward unresolved queries to a designated parent DNS server to obtain the answer.

The 2nd Server is an ISP level Forwarder DNS, At the ISP level, Forwarder DNS servers are typically configured to reduce bandwidth usage on port 53 (TCP/UDP) by caching as much DNS data as possible. This allows them to answer client queries directly from their cache, minimizing the need to forward requests upstream.
The 3rd Servers, are the Primary and Secondary DNS servers that contain the DNS zones. The ISP Forwarders must communicate with these authoritative servers to retrieve definitive (authoritative) answers for domains.
In this article, we will Install and configure all four types of Linux DNS Server Step by Step.
Lets get started…
Chapter1:
Primary DNS Server
Now it’s time to get into the detail configuration of the Primary DNS Server.
We will provide step by step Instructions from start to end.
In this chapter I’m going to show you a practical implementation of Primary DNS Server.
Please follow the steps as is. you can follow the video guide also.
Let’s dive right in.

What is a Primary or Master DNS Server?
A Primary DNS Server (also called a Master DNS Server) is the authoritative server for a specific domain. It holds the original DNS records and serves as the primary source of DNS information for that domain.
When other DNS servers or clients request these records, the Primary DNS Server provides them, and its responses are considered authoritative and final.

What is DNS Zone and Zone Files?
A DNS zone is a distinct part of a domain namespace, like “example.com”, within this zone, you can create sub-zones, like “marketing.example.com” or “sales.example.com“
Each zone contains various DNS records, such as:
- A records (map domain names to IP addresses)
- MX records (specify mail servers)
- CNAME records (provide domain aliases)
These DNS records are stored in special files called zone files. When a DNS client requests a record, the server retrieves the necessary information from these zone files and returns it.

What is DNS Query?
When we browse a website and type the domain name like http://domain_name in a browser, the browser needs to find the web server’s IP address to connect to that domain. To do this, it queries a DNS server to translate the domain name into an IP address. This process of resolving a name is called a DNS Query.
There are two types of DNS queries:
- Forward Query – Translates a domain name into an IP address.
- Reverse Query – Translates an IP address into a domain name.
For each zone, the Primary DNS server maintains two zone files: one for forward queries and another for reverse queries.

When a DNS server replies to a query, the response can be classified into two types:
- Authoritative answer
- Non-Authoritative answer
Authoritative Answer: DNS authoritative answer comes from the DNS server that has full control over the domain’s DNS records. It holds the official data (e.g., A, MX, or NS records), so its response is considered final.
Non-Authoritative Answer: This response is from a DNS server that doesn’t host the zone but has cached the result from a previous lookup. It doesn’t hold the official records but temporarily stores the information obtained from an authoritative DNS server.
We will see all these queries and answers during the practical sessions.
Now, lets Install the Primary DNS server and during the installation we will explain each of the concept we discussed earlier.
Our DNS Server Lab Scenario:
We will try to understand the Primary DNS Server configuration with an easy and small scenario, here, we have some devices on the network.
We will configure DNS records for them, so that, each device can communicate with other devices with their hostname instead of IP.

- DNS Server: ns1.lab.com (192.168.1.10)
- Local Subnet: 192.168.1.0/24
- Domain Name: lab.com
Install and Configure the Primary DNS Server
Now, lets begin the Installation, we will install the Primary DNS server with the following steps:
- Step #1: Update the System
- Step #2: Install DNS Server Packages
- Step #3: Explain named.conf File
- Step #4: Configure DNS Server Options
- Step #5: Create DNS Zone and Zone Files
- Step #6: Configure Forward Zone
- Step #7: Configure Reverse Zone
- Step #8: Test Master DNS Server
Step #1: Update the System
Before Install any DNS Server, always update the system to the latest packages.
apt update -y && apt upgrade -yStep #2: Install DNS Server Package
We will install the Primary DNS Server with Bind9, install bind9 and bind9 utilities.
apt install bind9 bind9utils -yThe Bind9 DNS server configuration files are located in the /etc/bind directory.
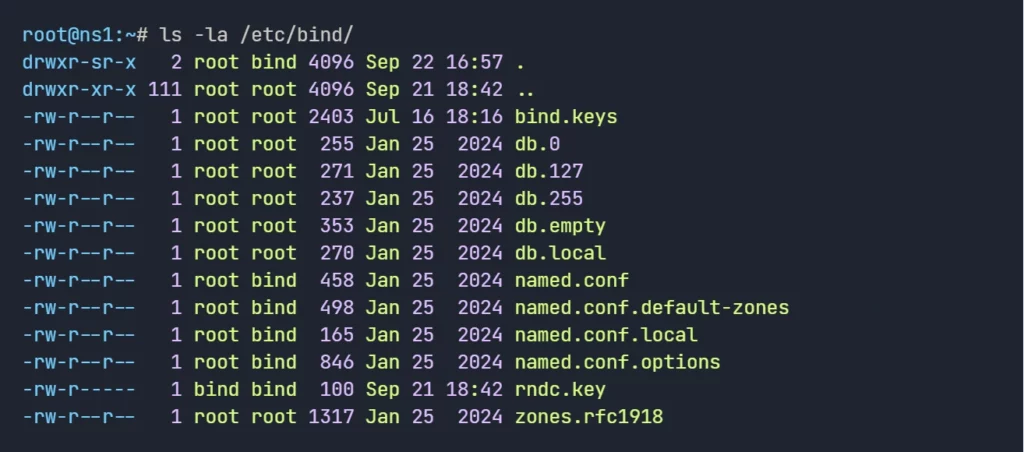

Step #3: Explain named.conf file
Next, we need to work with the Primary DNS Server Configuration files. Bind DNS Server’s main configuration file is /etc/bind/named.conf. but we will not directly edit this file, it includes other configuration files we needs to work with.
- named.conf file appears as follows:
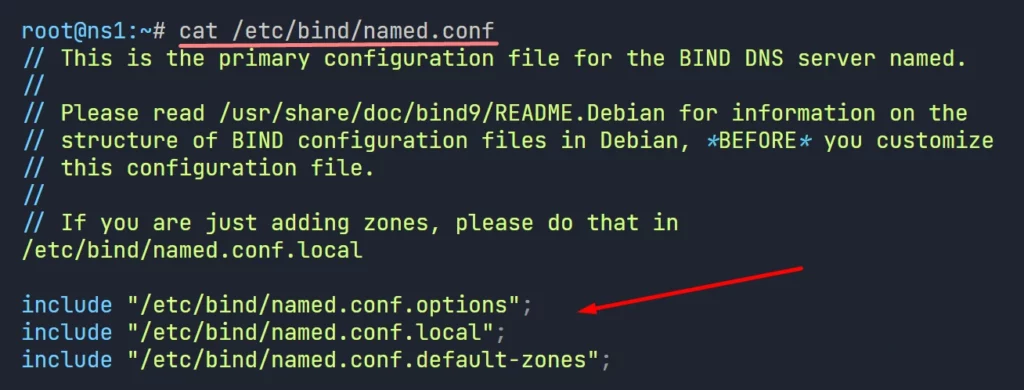
There are three files has been referenced from the named.conf.
- /etc/bind/named.conf.options: In this file, we provide Linux DNS server configuration parameters, how DNS server will behave, ACL, Forwarders, directories etc.
- /etc/bind/named.conf.local: in this file, we define zones, forward zone, reverse zone, if this DNS server maintains multiple zone, all zones should be defined here.
- /etc/bind/named.conf.default-zones: This file contains some default zone declarations, we normally leave the file as is.
To configure the Primary DNS server properly, lets work with each of these files.
Step #4: Configure DNS Server Options
Now, we need to configure the primary DNS with essential parameters. we need to edit the /etc/bind/named.conf.options file and provide the necessary configurations.
- The default configuration of the named.conf.options file appears as follows:
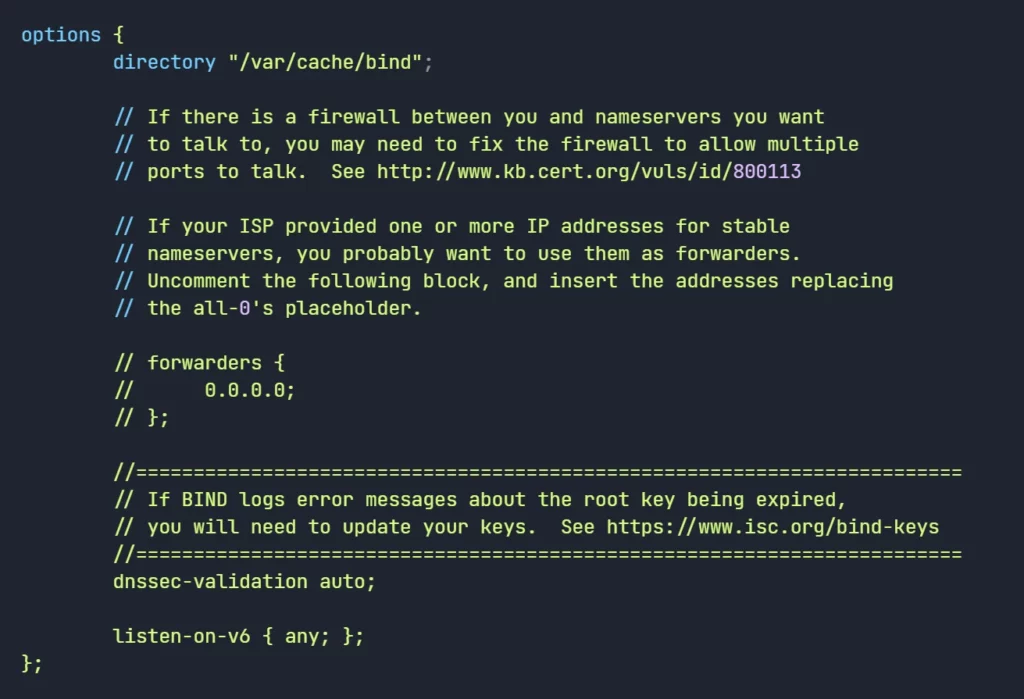
- We provided the parameters to run the Primary DNS server with minimum configuration.
vi /etc/bind/named.conf.options


acl local-network {
        192.168.1.0/24;
};

options {
        directory "/var/cache/bind";
        dnssec-validation auto;
        allow-query { localhost; local-network; };
        recursion yes;
        listen-on-v6 { none; };
        listen-on { 192.168.1.10; };

};

:x //save the file.Here are the Key Details of the above configurations:
- ACL: Defines a range of IP addresses that can interact with the Primary DNS server. Here, the local-network ACL includes the 192.168.1.0/24 subnet.
- directory: Specifies the working directory where BIND stores zone files, caches, and related data.
- dnssec-validation: Enables automatic DNSSEC validation for security.
- allow-query: Controls which clients can send DNS queries to the server.
- recursion: Determines whether the Primary DNS server should perform recursive queries on behalf of clients.
- forwarders: Defines upstream DNS servers to which our server forwards queries it cannot resolve locally (in this case, Google’s DNS servers).
- listen-on-v6: Configures whether the Primary DNS server should listen on IPv6 address.
- listen-on: Specifies the IPv4 address on which the DNS server listens for queries.
2. Restart BIND after applying the changes to ensure the configuration takes effect:
systemctl restart bind93. Check the Primary DNS Server status and Listening Ports.
systemctl status bind9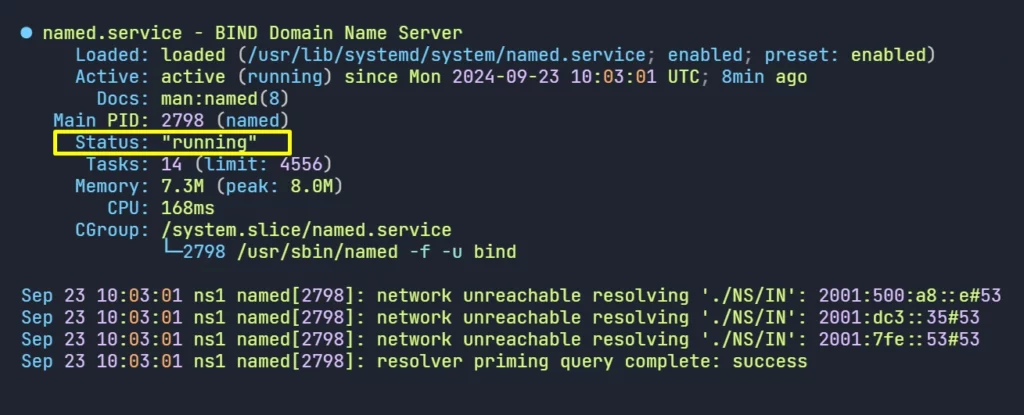
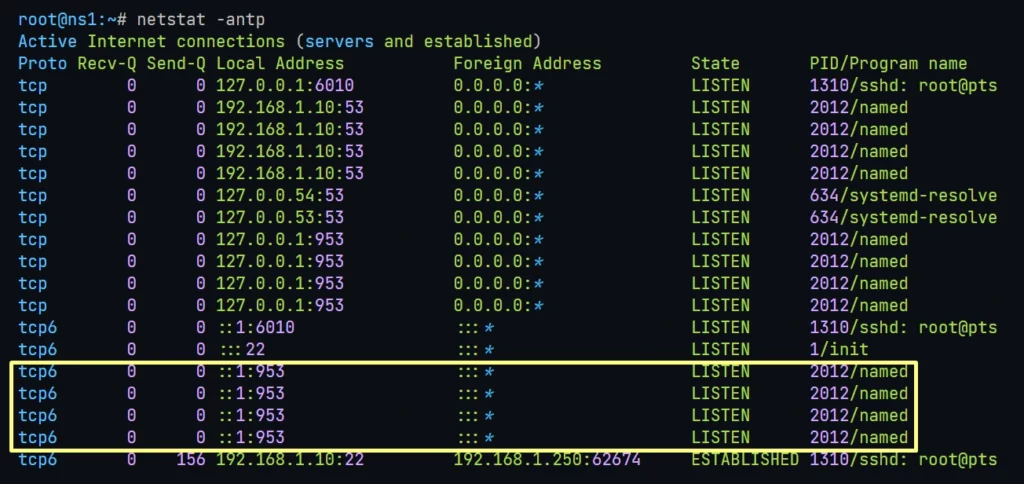
4. Check the Listening Ports and Sockets
netstat -antp
Everything seems ok, lets move to next step.
Step #5: Create DNS Zone and Zone Files
Now, we will create zones. we need to create two zones, a forward and a reverse zone.

We will create zone files under /etc/bind/zones directory, this is optional, but a good practice.
- Create the /etc/bind/zones directory and assign permissions
mkdir /etc/bind/zones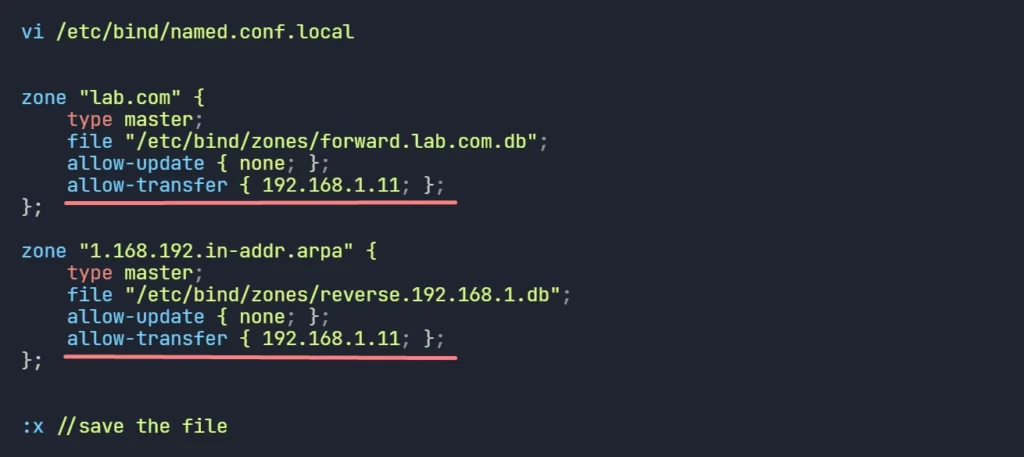
chown root:bind /etc/bind/zonesWe configured two DNS zones “zone lab.com” is the forward zone for the domain “lab.com” and “zone 1.168.192.in-addr.arpa” is the reverse zone declaration for the 192.168.1.0/24 network
We also specified the respective file locations for each zone where their records will be stored.
vi /etc/bind/named.conf.local


zone "lab.com" {
    type master;
    file "/etc/bind/zones/forward.lab.com.db";
    allow-update { none; };
};

zone "1.168.192.in-addr.arpa" {
    type master;
    file "/etc/bind/zones/reverse.192.168.1.db";
    allow-update { none; };
};


:x //save the fileSummary of Important Parameters:
- zone: Defines the zone name, either for a domain (forward) or network (reverse).
- type: Specifies the type of zone (e.g., master, slave, or forward).
- file: Indicates the file where zone data (DNS records) is stored.
- allow-update: Controls whether dynamic DNS updates are allowed. Setting it to none blocks automatic changes, improving security.
Step #6: Configure Forward Zone
Now, we have to create the DNS records for the devices on the network. we need to create the zone files. we will create two zone file one for the forward zone, another for the reverse zone.
we can easily create the zone file by copying the existing localhost zone files from the /etc/bind directory.
cd /etc/bind
cp db.local zones/forward.lab.com.db- default forward zone file will appear as follows:

- lets edit the file “forward.lab.com.db” and create DNS records for the network devices.
vi /etc/bind/zones/forward.lab.com.db


$TTL    604800
@       IN      SOA     ns1.lab.com. root.lab.com. (
                              2         ; Serial
                         604800         ; Refresh
                          86400         ; Retry
                        2419200         ; Expire
                         604800 )       ; Negative Cache TTL


@       IN      NS      ns1.lab.com.

ns1     IN      A    192.168.1.10
laptop1 IN      A    192.168.1.21
laptop2 IN      A    192.168.1.22
pc1     IN      A    192.168.1.23
pc2     IN      A    192.168.1.24
pc3     IN      A    192.168.1.25
phone   IN      A    192.168.1.26
printer IN      A    192.168.1.27


:x //save the fileKey Points of the above configurations:
- SOA Record: Defines the authoritative server and basic zone control parameters (serial, refresh, retry, etc.).
- NS Record: Points to the Linux DNS server (ns1.lab.com) responsible for resolving the domain.
- A Records: Map specific hostnames (e.g., laptop1, pc1, phone) to their corresponding IP addresses in the 192.168.1.x network.
So, from now on each device can communicate other device using their hostname instead of IP addresses.
Step #7: Configure Reverse Zone
Now, lets create the reverse zone. Reverse zone allows for the resolution of IP addresses back to hostnames.
like before, we can copy the existing localhost zone to create the new reverse zone file.
cd /etc/bind
cp db.127 zones/reverse.192.168.1.db- default reverse zone file will appear as follows:

- lets create the reverse entries for the devices.
vi /etc/bind/zones/reverse.192.168.1.db


$TTL    604800
@       IN      SOA     ns1.lab.com. root.lab.com. (
                              1         ; Serial
                         604800         ; Refresh
                          86400         ; Retry
                        2419200         ; Expire
                         604800 )       ; Negative Cache TTL

@       IN      NS      ns1.lab.com.

; PTR Records for Reverse Lookup
;
10      IN      PTR     ns1.lab.com.
21      IN      PTR     laptop1.lab.com.
22      IN      PTR     laptop2.lab.com.
23      IN      PTR     pc1.lab.com.
24      IN      PTR     pc2.lab.com.
25      IN      PTR     pc3.lab.com.
26      IN      PTR     phone.lab.com.
27      IN      PTR     printer.lab.com.


:x //save the fileKey points of the above configurations:
- Time to Live (TTL): $TTL 604800: Specifies the default time-to-live for DNS records, set to 604800 seconds (1 week).
- Start of Authority (SOA) Record: Indicates the authoritative name server (ns1.lab.com) and the email of the administrator (root.lab.com).
- Serial Number: Set to 1. This should be incremented with each update to the zone.
- Refresh, Retry, Expire, Negative Cache TTL: Standard parameters for DNS operations.
- Name Server (NS) Record: Designates ns1.lab.com as the authoritative name server for this reverse zone.
- Pointer (PTR) Records: PTR records maps IP to Hostnames, whereas A record maps hostname to IP.
now, the reverse query for the devices can return the hostnames as they are configured on the reverse zone.
Disable Bind service to listen on IPv6.
- by default, Bind listens on IPv4 and IPv6 both IP’s
- disable IPv6, Allow only IPv4.
vi /etc/default/named

OPTIONS="-u bind -4"

:x //save the fileNext, Restart DNS service to take all the changes in affect.
systemctl restart namedDNS Server Configuration and Syntax Check:
We need to check our Linux DNS server configurations are valid, we need to do a syntax check.
1. Checking the Linux DNS Server configuration file and syntax.
named-checkconf /etc/bind/named.conf.local
named-checkconf /etc/bind/named.conf.optionsfor valid configuration it wont say anything, if any issue found, it will pop error message.
2. Checking Forward and Reverse zone files syntax
named-checkzone lab.com /etc/bind/zones/forward.lab.com.db
named-checkzone 1.168.192.in-addr.arpa reverse.192.168.1.db

The configuration files and zone files syntax seems ok.
Now, lets learn how to test Linux DNS server with various tools and techniques.
Step #8: Test Master DNS Server
Our Linux DNS server Configuration is done. now we will test the hosts can communicate with other host by using hostname instead of IP.

So, this will be the scenario now, before communicate with other host, each device will communicate with the Linux DNS server to resolve the hostname of the destination host.
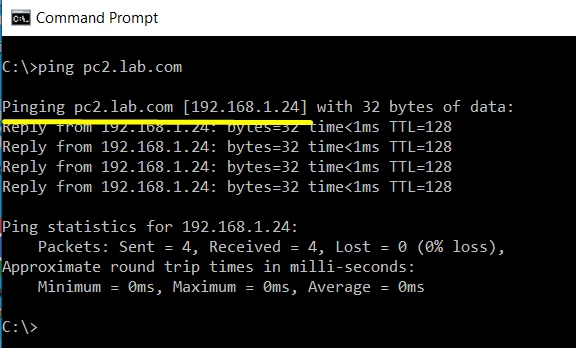
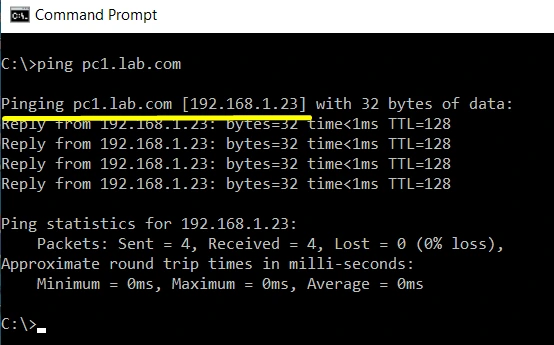
Test #1: Test DNS Name Resolution Using Ping
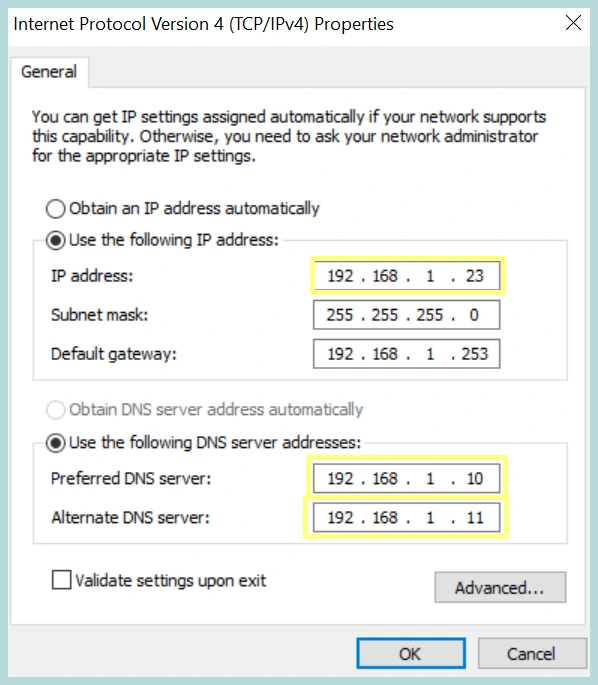
We will do a simple Name resolution test using Ping, we need to set Linux DNS Server IP on the PC1 and PC2, then we will do ping test from PC1 to PC2 and PC2 to PC1.
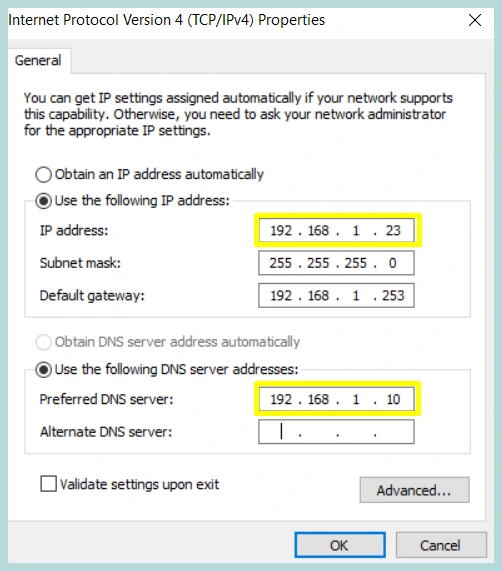
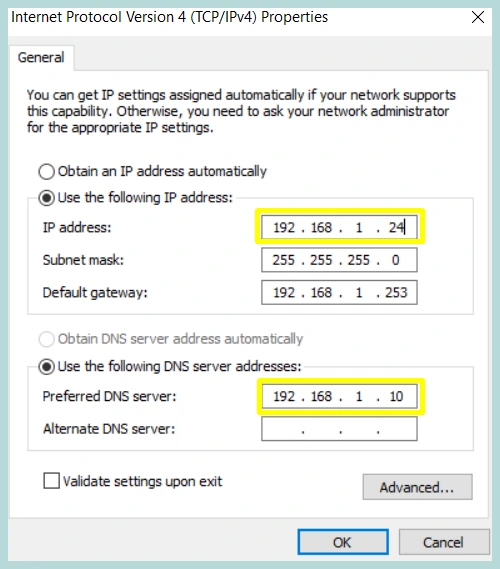
Both PC’s are configured with proper DNS Settings, and can ping each other using hostname, successfully resolving hostnames concludes the test.
Test #2: Test DNS Server with ‘nslookup’
there are numerous tools available in both windows and Linux platform to do in-depth DNS query, among those, ‘nslookup‘, ‘dig‘ and ‘host‘ are very popular because they are found on the system by default.

In windows only ‘nslookup‘ is available whereas on Linux we can use all three (dig, host and nslookup).
Few common nslookup Query and results are provided below:
#1. Query default DNS server:
nslookup lab.com
#2. Query a specific DNS server:
nslookup lab.com 192.168.1.10
#3. Query Specific Record type (A, MX, TXT, etc.):
nslookup -type=NS lab.com
#4. Forward Lookup Query
nslookup pc1.lab.com
#5. Reverse Lookup Query
nslookup 192.168.1.24
#6. Verbose Query
nslookup -debug lab.comTest #3: Test DNS Server with ‘host’ tool
Another powerful DNS Query tool is ‘host‘, lets see some of its query parameters.
#1. Forward Lookup Query
host pc1.lab.com
#2. Reverse Lookup Query
host 192.168.1.24
#3. Query specific DNS record types ex: (Query MX records)
host -t MX lab.com
#4. Display verbose output
host -v lab.com
#5. Force a lookup in the ARPA domain (reverse DNS lookup)
host -t PTR 192.168.1.25
#6. Display all available records
host -a lab.com
#7. Perform non-recursive queries
host -r example.comTest #4: Test DNS Server with ‘dig’ tool
dig is the most powerful tool among the others we discussed, lets see some DNS Query using dig command.
#1. Basic A record query
dig lab.com
#2. Query a specific DNS record type ex: Mail Exchanger record.
dig lab.com MX
#3. Reverse DNS lookup (PTR record):
dig -x 192.168.1.25
#4. Query a specific DNS server
dig @192.168.1.10 lab.com
#5. Query with short output (just the IP)
dig +short lab.com
#6. Query with detailed output (verbose mode)
dig +noall +answer lab.com
#7. Query DNS for all available record types (ANY)*
dig lab.com ANY
#8. Perform a non-recursive query
dig +norecurse lab.com
#9. Query authoritative name servers (NS records)
dig lab.com NS
#10. Query for CNAME (Canonical Name) records
dig example.com CNAME
#11. Display the query time
dig lab.com +stats
#12. Trace the entire DNS resolution path
dig lab.com +traceChapter2:
Slave DNS Server
Now we will go into the detail configuration of the Secondary or Slave DNS Server.
We will provide step by step Instructions from start to end.
In this chapter I’m going to show you a practical implementation of the Secondary DNS Server.
Please follow the steps as is. you can follow the video guide also.
Let’s dive right in.
What is Secondary or Slave DNS Server?
A Secondary DNS Server (also called as Slave DNS Server) is a backup DNS server. It holds a read-only copy of the DNS zone file from the primary (or master) DNS server. It’s main function is to provide redundancy and load balancing of the DNS queries.
If the Primary or Master DNS Server goes down or come offline for network issues, the Secondary DNS server can continue responding to DNS queries, ensuring that the domain remains accessible.
Secondary DNS server also help to distribute the DNS query load. When multiple DNS servers are available, queries can be sent to any of them, reducing the load on the primary server.

On the above diagram, we tried to explain how the Secondary Linux DNS Server works on the internet.
When a client asks for a record of a domain, first-contact DNS Server tries to locate the target domains DNS Server with the help of Root Name Servers (Internet Registry).
In this case, cnn.com has two DNS Server ns1.cnn.com and ns2.cnn.com, Local DNS will try to communicate with the ns1.cnn.com, if it is found inactive or non responsive then it will communicate with the ns2.cnn.com to retrieve the desired records.
What is Zone Transfer?
Master and Slave DNS Server remains up to date with the zone data through Zone transfer. Usually Master DNS Server sends periodic zone update to the Slave DNS Server.

This is a very common practice to deploy a dedicated Linux DNS Server for the Secondary DNS, but in this scenario, slave DNS just stays stand-by, it doesn’t do anything when the master is alive.
As we discussed earlier, master/slave design is not server specific, it is zone specific.
The idea can be more clarified with the below diagram, here we have 2 zones and two Linux DNS Servers. domain1.com and domain2.com, for domain1, ns1 is the master and ns2 is the slave, whereas for domain2 ns2 is the master and ns1 is slave.

There is no particular Linux DNS Server working as a master or slave in this design, instead they both contain master and slave zones and are responsible to transfer to their slave parts.

So, both Linux DNS Server will update each other with the zone transfer.
Slave DNS Server Lab Scenario:
Previously we deployed a Linux DNS server as Master DNS, Now we will upgrade the scenario by adding another Linux DNS Server as Secondary or Slave DNS Server.
Clients functionality will remain same, but now clients can configure their DNS Settings with another Linux DNS Server as their alternate DNS Server.

- DNS Server: ns1.lab.com (192.168.1.10)
- DNS Server: ns2.lab.com (192.168.1.11)
- Local Subnet: 192.168.1.0/24
- Domain Name: lab.com
Secondary DNS Installation Prerequisites:
Before Secondary DNS configuration, we have some configurations on the Master DNS.
Please go to Master DNS Server and Perform the followings:
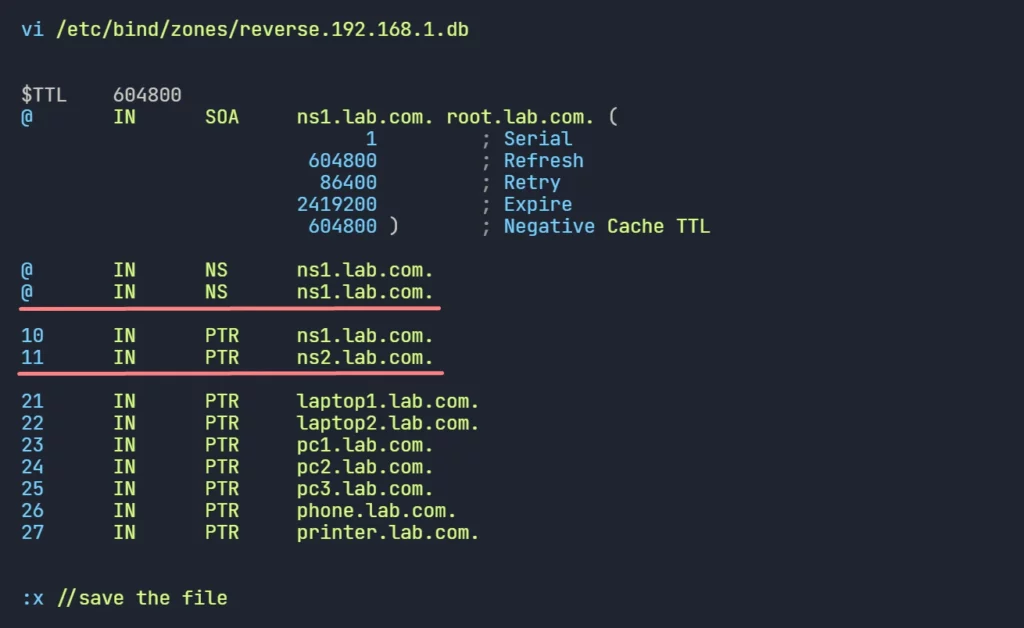
1. Create DNS Records for the Slave DNS:
- Edit /etc/bind/zones/forward.lab.com.db and Update with the ns2 record.
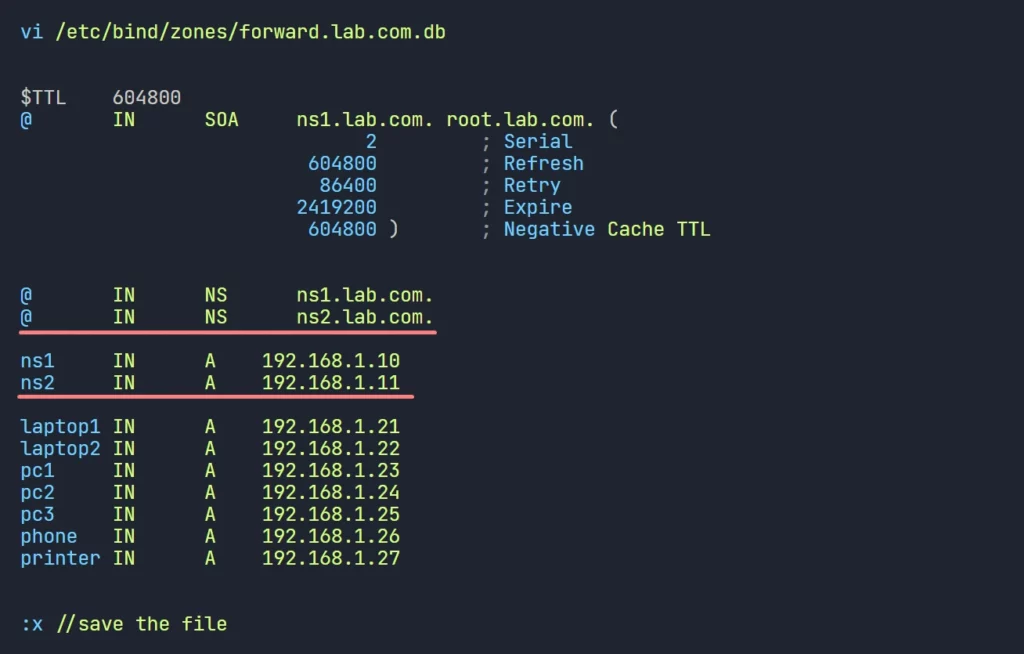
- Edit /etc/bind/zones/reverse.192.168.1.db and Update with the new PTR records.
2. Allow Slave DNS to Get Zone Data:
Zone transfer is restricted, only allowed servers will be able to get the zone data from the master server. So, slave Linux DNS servers must be allowed.
- Edit /etc/bind/named.conf.local and add allow-transfer { slave_server_ip; }; directive for both forward and reverse zone.
- Now, Restart the Bind Service on the Master Server. to take effect the changes.
We are done on the Master DNS side, Now lets install the Secondary Linux DNS Server.
Install and Configure the Slave DNS Server
We will install the Slave DNS server with the following steps:
- Step #1: System Preparation
- Step #2: Update the System
- Step #3: Install DNS Server Packages
- Step #4: Configure DNS Server Options
- Step #5: Configure Slave Zone Files
- Step #6: Test Slave DNS Server
Step #1: System Preparation
Before any Linux DNS Server Setup, we have to prepare our systems with the hostname, FQDN, ip configuration etc.
1. Setup Hostname:
hostnamectl set-hostname ns2.lab.com2. Setup FQDN (Fully Qualified Domain Name):
vi /etc/hosts
127.0.0.1 localhost
192.168.1.11 ns2.rainbow.com ns2
:x //save the fileCheck with hostname, hostname -f and dnsdomainname commands.
3. Network Configuration:
Using the Master DNS Server as the preferred nameserver address: after DNS server installation we can change its own IP as the Preferred Name Server Address.
vi /etc/netplan/50-cloud-init.yaml
network:
ethernets:
ens32:
addresses:
- 192.168.1.11/24
nameservers:
addresses:
- 192.168.1.10
search: []
routes:
- to: default
via: 192.168.1.253
version: 2
:x //save the file
netplan apply4. Disable AppArmor
We are not using AppArmor, better disable it, otherwise it cause issue when zone transfers.
systemctl stop apparmor
systemctl disable apparmorSystem preparation is done, lets move to next step.
Step #2: Update the System
It is recommended to Update and Upgrade with the latest packages.
apt update -y && apt upgrade -yStep #3: Install DNS Server Package
Slave DNS Server also needs to Install the DNS Server Packages.
apt install bind9 bind9utils -yLike before, all the Linux DNS server configuration files will be found in the /etc/bind directory.
Step #4: Configure DNS Server Options
Like the Master DNS Server, we need to configure the Slave DNS Server with the same options we applied for the Master DNS.
On the listen-on { slave_server_ip; }; we need to provide Slave Server IP here.
vi /etc/bind/named.conf.options
acl local-network {
192.168.1.0/24;
};
options {
directory "/var/cache/bind";
dnssec-validation auto;
allow-query { localhost; local-network; };
recursion yes;
listen-on-v6 { none; };
listen-on { 192.168.1.11; };
};
:x //save the file.Step #5: Configure Slave Zone files
Now, we need to create the zone file options, on the Master DNS we declared as ‘type master’ now we have to declare as ‘type slave’ on the slave server.
For each zone we have to declare the ‘master server ip’ as ‘masters’
vi /etc/bind/named.conf.local
zone "lab.com" {
type slave;
file "/etc/bind/zones/forward.lab.com.db";
masters {192.168.1.10;};
allow-notify {192.168.1.10;};
};
zone "1.168.192.in-addr.arpa" {
type slave;
file "/etc/bind/zones/reverse.192.168.1.db";
masters {192.168.1.10;};
allow-notify {192.168.1.10;};
};
:x //save the fileSummary of Important Parameters:
- type slave: Defines the DNS zone as a slave zone, meaning the server will pull its data from a master server rather than holding the primary copy.
- file “/etc/bind/zones/…”: Specifies the local file where the slave zone data is stored. This file will be updated automatically when the slave synchronizes with the master.
- masters { 192.168.1.10; };: Identifies the IP address of the master DNS server from which the slave will retrieve zone data.
- allow-notify { 192.168.1.10; };: Permits the slave to receive notifications from the master (192.168.1.10) when the zone data is updated, prompting the slave to refresh its copy.
Configuration and Syntax Check:
named-checkconf /etc/bind/named.conf.local
named-checkconf /etc/bind/named.conf.optionsCreate /etc/bind/zones Directory:
mkdir /etc/bind/zones
chown bind:bind /etc/bind/zonesDisable Bind service to listen on IPv6:
- disable IPv6, Allow only IPv4.
vi /etc/default/named

OPTIONS="-u bind -4"

:x //save the file- Next, Restart DNS service to take all the changes in affect.
systemctl restart namedStep #6: Test Slave DNS Server
Now, we will check all Linux DNS Server’s are working properly.
We will testify Slave DNS Server functionality. main objective of these tests are to ensure Master and Slave both DNS Server can communicate as expected and can transfer zone data.
Test #1: Check Zone files are Auto Created
- If all configurations are ok from both (master and slave) sides, after final restarting the DNS Service on the Slave DNS, we will see both forward and reverse zone files are available on the /etc/bind/zones directory of the Slave DNS Server. these files will be auto created.

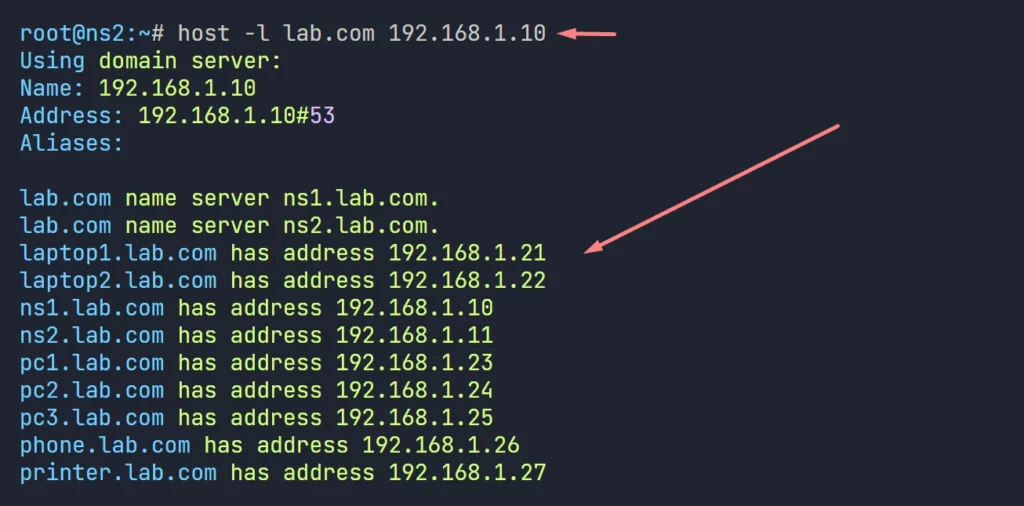
Test #2: Check Slave DNS can Manually Transfer Zone Data.
this is kind of a Linux DNS Server’s troubleshooting step, if the zone are not transferring, then we can do the test. sometimes, if we see any issue on zone transfer, we can perform this test.
- On the Slave Server, Execute the command ‘host -l lab.com 192.168.1.10’, this command shows all the data of a particular zone from a specific server through zone transfer.
Test #3: Check Name Resolution From Slave DNS
- Shutdown the Master DNS
- Try to ping other nodes using their hostname, if the slave DNS have the zone info properly, it can do the name resolution successfully.
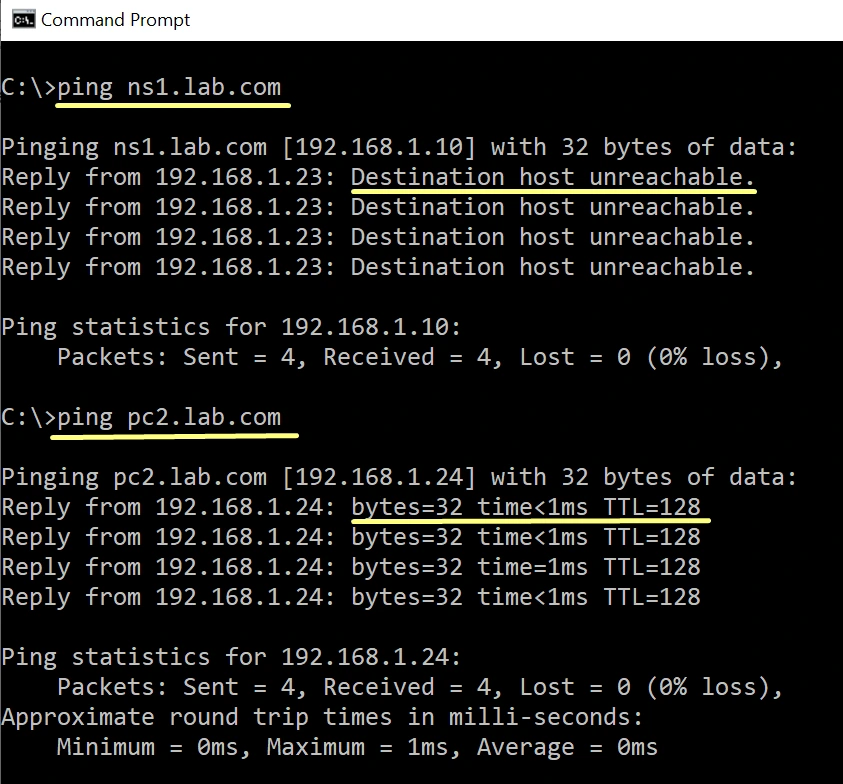
On the above test, ns1.lab.com is clearly shutdown, though it can resolve and ping pc2.lab.com, because PC1 DNS has the Slave DNS as the Alternative DNS.
Chapter3:
Caching DNS Server
Now we will explain and demonstrate the detail configuration of the Caching DNS Server.
We will provide step by step Instructions from start to end.
In this chapter I’m going to show you a practical implementation of the Caching DNS Server.
Please follow the steps as is. you can follow the video guide also.
Let’s dive right in.
What is Caching DNS Server?
A Caching DNS Server is a special type of DNS server which stores (or caches) DNS query results to speed up future requests for the same DNS query.
When a user do a DNS query, the caching DNS server checks its cache to see, if the results are already in the cache. If it is found, it returns the stored result without querying the external DNS servers. which significantly reduce the query response time and bandwidth usage.
Caching DNS Server has no zone configurations. So, it cannot be an authorized DNS Server. answers from Caching DNS are always non-authoritative answers.

How Caching DNS Server Works?
On the above scenario, we have tried to give you an overall picture, how a Caching DNS Server works.
When client’s asks for any DNS query to the Caching DNS server, It Searches for the authorized DNS Server for that query on the Internet, with the help of ‘Root Name Servers’, and caches the reply’s immediately for a time period. then, it replies back to the user from its cache.
for further query about the same DNS records, Its always return results from its DNS cache.
When to use Caching DNS Server?
A Caching DNS Server best suits for small organizations where deploying a full-fledged Primary Linux DNS server may not be necessary.
If you have servers or devices on the network that need to communicate with each other, deploying a primary Linux DNS server would be essential to resolve local hostnames, which we described earlier.

However, if your network primarily requires internet access, a caching Linux DNS server can be used to speed up name resolutions by storing frequently requested domain information.
On the above diagram, all devices are using the Caching DNS as their preferred DNS server.
Caching DNS Server Lab Scenario:
In this practical session, we are going to install a Linux DNS Server as a Caching-only DNS.
A Caching DNS Server doesn’t need to be part of a specific domain, it can operate as a standalone Linux DNS server with any hostname. Local devices, whether part of a domain or not, can still rely on the local caching DNS server for name resolution.

- DNS Server: cadns.lab.com (192.168.1.15)
- Local Subnet: 192.168.1.0/24
Install and Configure the Caching DNS Server
We will install the Caching DNS server with the following steps:
- Step #1: Update the System
- Step #2: Install DNS Server Packages
- Step #3: Configure DNS Server Options
- Step #4: Test Caching DNS Server
Step #1: Update the System
Update the system with the latest packages.
apt update -y && apt upgrade -yStep #2: Install DNS Server Package
Install the Bind9 and Bind9 Utility packages
apt install bind9 bind9utils -yDNS server configuration files will be available in the /etc/bind directory.
Step #3: Configure DNS Server Options
Like the Other Linux DNS Servers, we need to configure the DNS Server options.
vi /etc/bind/named.conf.options
acl local-network {
192.168.1.0/24;
};
options {
directory "/var/cache/bind";
dnssec-validation auto;
allow-query { localhost; local-network; };
recursion yes;
listen-on-v6 { none; };
listen-on { 192.168.1.15; };
};
:x //save the file.Here, the most Important option is the ‘listen-on’ directive. and the ACL, we are only allowing ‘Local Network’ devices to connect to this Linux DNS Server. ‘/var/cache/bind‘ is the default cache directory.
To configure a Caching DNS server, we don’t need any more changes on the system.
- Now, Allow only IPv4 address to listen-on for the DNS Service.
vi /etc/default/named

OPTIONS="-u bind -4"

:x //save the file- Next, Restart DNS service to take all the changes in affect.
systemctl restart named- Now, Check the DNS service are in listening state.
netstat -antp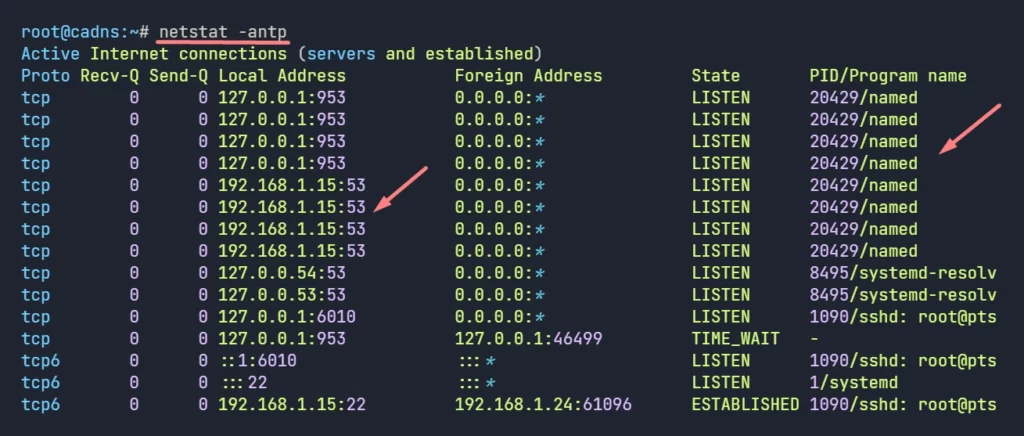
So, Caching DNS server is in listening mode, that’s good.
Step #4: Test Caching DNS Server
Now, we will test Caching DNS server by configuring some network devices to use the caching DNS server as their preferred DNS.
Later, we will test How DNS caching works on the Caching DNS with other commands.
Test #1: Check Name Resolution From Caching DNS
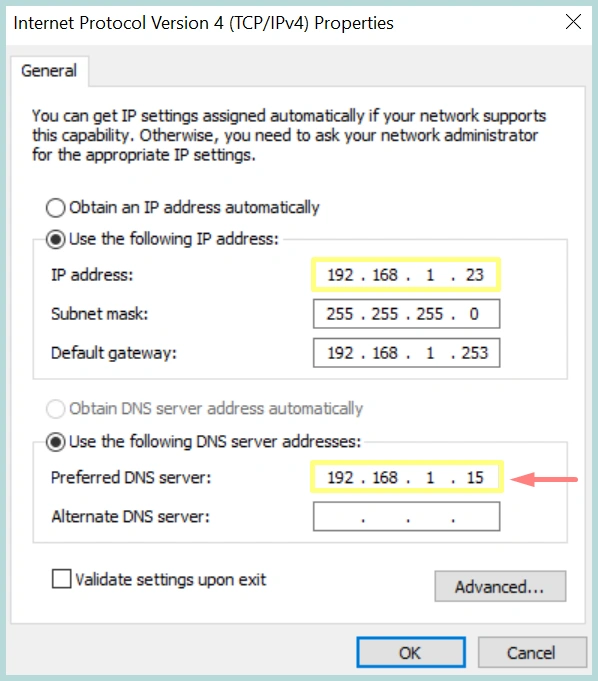
We will configure PC1 to use the Caching DNS Server as the preferred DNS and we will do a ping test to internet.
if the client can communicate using hostname, that will prove caching DNS is performing name resolution properly.

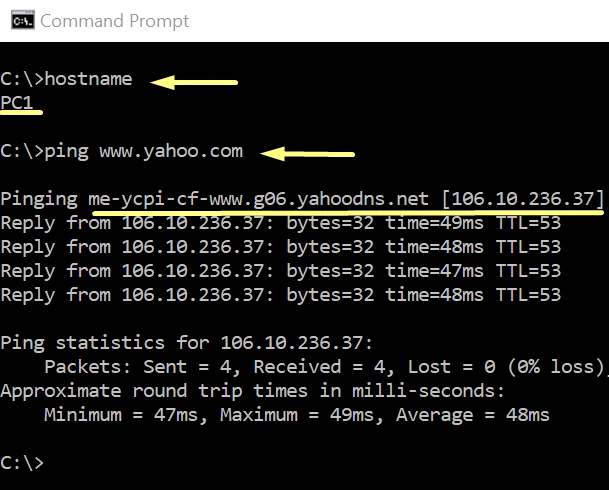
The above tests proves, our caching DNS server is working properly.
Test #2: DNS Query Test with Host Tool
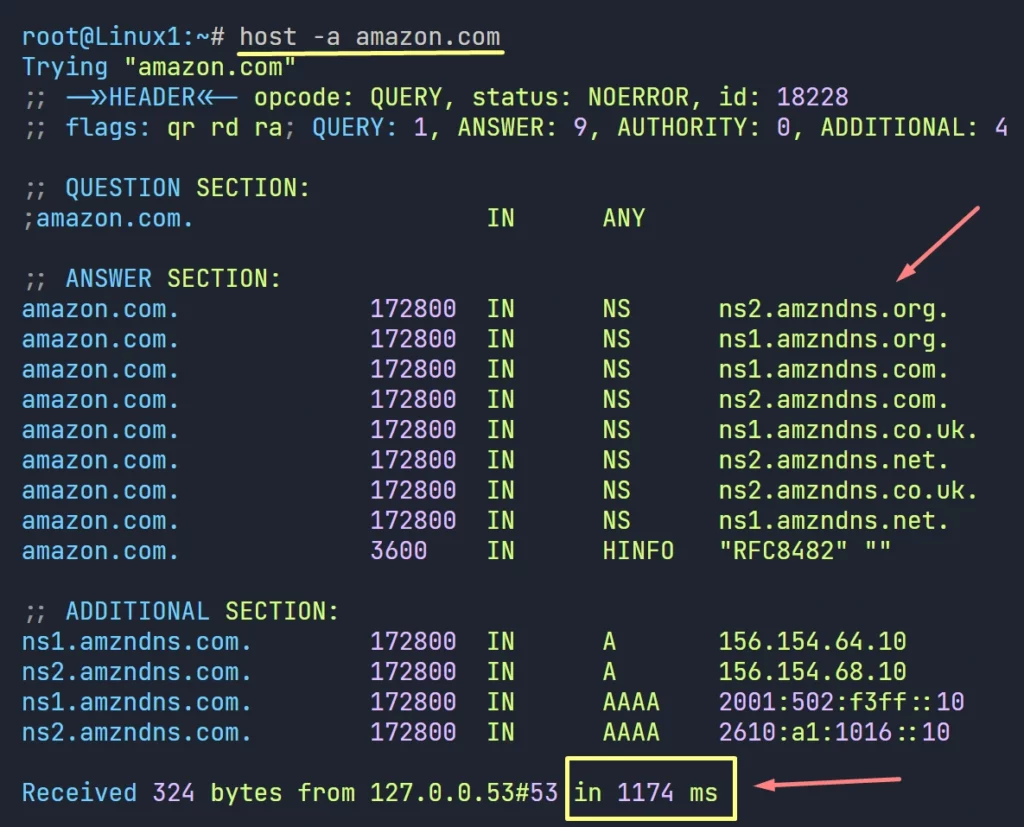
We are querying Caching DNS with host utility, trying to pull data so that it can build some cache. execute the same command for different domain:
host -a google.com
host -a yahoo.com
host -a amazon.com
Test #3: Checking Cache on the Caching DNS
To verify the DNS caching, we need to execute the same query, and notice the response time difference.
On the above picture our first query took 612 ms to get the response. now lets query again.
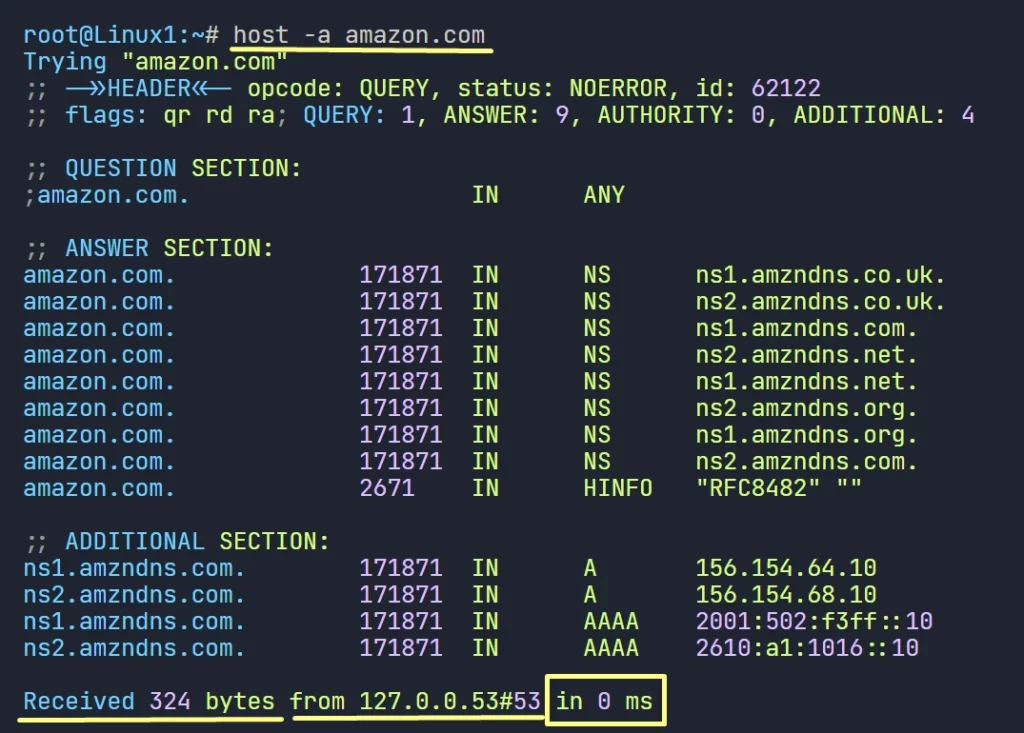
2nd query responds with the same result, with only 0 ms, that’s a clear cache response.
Lets Open the cache, and see the cache data are there.
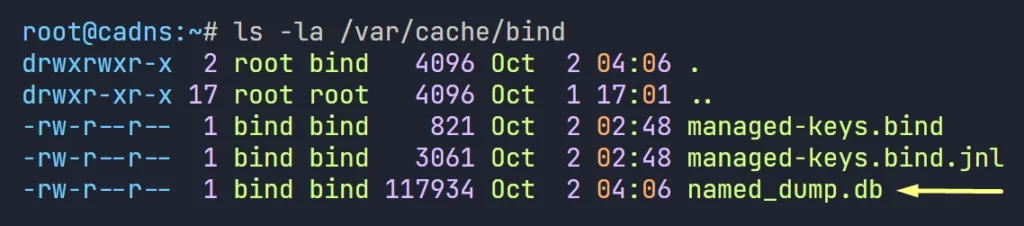
- Execute the below command on the caching DNS server, to dump its cache.
rndc dumpdb -cache- Now, Check the cache directory at /var/cache/bind, it has a new file name ‘named_dump.db’ this is the dump file of all the caches on the Caching DNS server.
- Now, lets open the file and look for amzndns.co.uk, we can see there are cache records.
root@cadns:~# vi /var/cache/bind/named_dump.db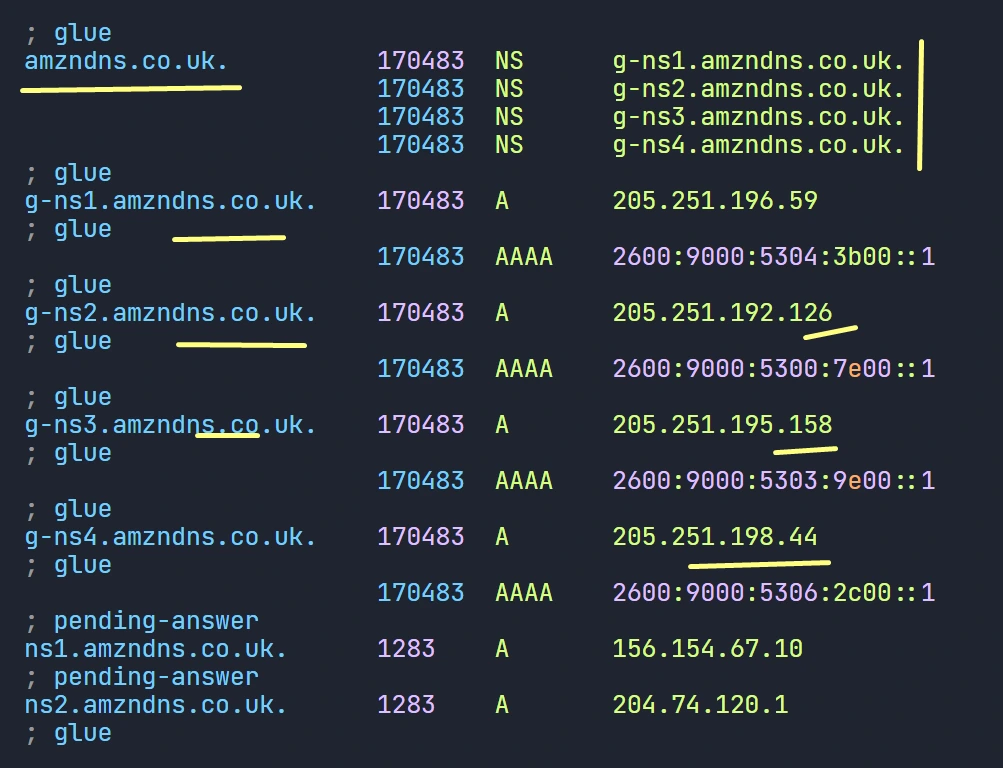
Test #4: Flush Cache from Caching DNS and Query again
We may need to flush the cache on a caching DNS server for various reasons. To immediately retrieve the latest data, flushing the cache is necessary.
- To flush the existing DNS cache from the caching DNS execute the command:
rndc flush- Now, if you try the same DNS query we run earlier, it will take longer time again, because it has to retrieve the DNS records by doing its search over the internet.
Chapter4:
Forwarding DNS Server
Now we will explain and demonstrate the detail configuration of the Forwarding DNS Server.
We will provide step by step Instructions from start to end.
In this chapter I’m going to show you a practical implementation of the Forwarding DNS Server.
Please follow the steps as is. you can follow the video guide also.
Let’s dive right in.
What is Forwarding DNS?
When a DNS server does not have the requested information in its cache or local zone files:
Instead of performing full recursive lookups by itself, it forwards or passes the query to one or more external DNS server (forwarders). This DNS server is considered as a Forwarding DNS server.

Generally, when a Linux DNS server doesn’t have the queried data, then it looks for the data on the internet, it starts from the Root name servers, but a forwarding DNS server doesn’t go to root name servers, rather it forwards queries to Upper level DNS server like ISP DNS servers.
When to Deploy Forwarding DNS
DNS forwarding is a feature or mechanism every Linux DNS server can configure. but its a serious deal. It changes the complete behavior of the DNS server. It becomes dependent (or non-recursive in nature) on the upper level DNS for the DNS queries.
Here are some key reasons to configure forwarding DNS:
- Faster Query: If the ISP/Public DNS servers has already cached the result of a query, it will respond faster than a recursive resolver starting from the root servers.
- DNS Filtering: ISP/Public DNS Servers sometime offers additional layers of security, It may block malicious domains, can protect against phishing and malware.
- Anonymity: Using a forwarder to a secure DNS server (like DNS over HTTPS) can prevent eavesdropping on DNS queries.
- Network Policy: Sometimes, organizations needs DNS logging for compliance or auditing purposes. Forwarders can be configured to log all DNS queries from all Lower DNS servers

The above figure shows, any type of Linux DNS server can be configured to forward queries to Forwarders, the ISP or Public Forwarders must allow lower level DNS’s to send queries to them.
Forwarding DNS Server Lab Scenario:
In this session, we will install a Linux DNS Server as Forwarding DNS. we will be needing two server for this practice, one will act as forwarding DNS another will be the Forwarder.

- Forwarding DNS: cadns.lab.com (192.168.1.15)
- Forwarder DNS: ns1.lab.com (192.168.1.10)
- Local Subnet: 192.168.1.0/24
Install and Configure the Forwarding DNS Server
We will install the Forwarding DNS server with the following steps:
- Step #1: Update the System
- Step #2: Install DNS Server Packages
- Step #3: Configure DNS Server Options
- Step #4: Test Forwarding DNS Server
Step #1: Update the System
Update the system with the latest packages.
apt update -y && apt upgrade -yStep #2: Install DNS Server Package
Install the Bind9 and Bind9 Utility packages
apt install bind9 bind9utils -yDNS server configuration files will be available in the /etc/bind directory.
Step #3: Configure DNS Server Options
We need to configure the Linux DNS Servers options, it must contain forwarders option:
vi /etc/bind/named.conf.options
acl local-network {
192.168.1.0/24;
};
options {
directory "/var/cache/bind";
dnssec-validation auto;
allow-query { localhost; local-network; };
recursion yes;
listen-on-v6 { none; };
listen-on { 192.168.1.15; };
forwarders {
192.168.1.10;
};
};
:x //save the file.Here, everything is like the caching DNS configuration, except the the forwarders option which defines the upstream DNS servers to which our server forwards queries. in this case the ns1.
We can add multiple Forwarders in the Linux DNS Server configuration:
forwarders {
192.168.1.10;
8.8.8.8;
};In that case, 2nd one will be used as a backup forwarder, if 1st one becomes non-responsive then the backup forwarder will work.
We don’t need any more changes on the system.
- Now, Allow only IPv4 address to listen-on for the DNS Service.
vi /etc/default/named

OPTIONS="-u bind -4"

:x //save the file- Next, Restart DNS service to take all the changes in affect.
systemctl restart named- Now, Check the DNS service are in listening state.
netstat -antp
So, Forwarding DNS server is running just fine.
Step #4: Test Forwarding DNS Server
Now, we will test both Linux DNS Sever here. the Forwarding DNS server and the forwarder. we will see how forwarder works on behalf of the forwarding DNS Server to resolve queries.
The forwarding DNS must be allowed by the forwarder to get answer from it.
Test #1: Check Name Resolution works Using Forwarding DNS
To testify the name resolution is working properly, we need to configure a device and need to check both forwarding and forwarder DNS.

1. Configure PC1 to use the Forwarding DNS as the preferred DNS.
2. Run the ping test from the PC1
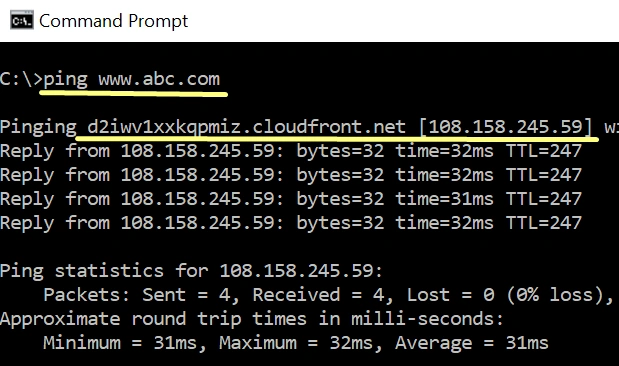
Ping test is successful, it can resolve the www.abc.com
3. Check the cache from the forwarding server, as it replies to PC1, it should cache the result.
root@cadns:~# rndc dumpdb -cacheroot@cadns:~# cat /var/cache/bind/named_dump.db | grep abc.com
abc.com. 884 \-DS ;-$NXRRSET
www.abc.com. 284 CNAME d2iwv1xxkqpmiz.cloudfront.net.4. Now, check the cache from the forwarder, as it queries for the forwarding DNS, it should also cache the result. Both Linux DNS Server will cache the result.
root@ns1:~# rndc dumpdb -cacheroot@ns1:~# cat /var/cache/bind/named_dump.db | grep abc.com
abc.com. 172791 NS ns-318.awsdns-39.com.
www.abc.com. 291 CNAME d2iwv1xxkqpmiz.cloudfront.net.So, from the above test, both Forwarding and Forwarder DNS have the same result in cache, so we can confirm the test is successful.
Test #2: How Forwarding DNS get Faster Result Using a Forwarder
Now, we’ll test how quickly the forwarding DNS gets a response from the forwarder. We’ll also observe how long it takes for the forwarding DNS to handle the same query if the forwarder is not present.
1. do the below zone query on the Forwarder (ns1.lab.com).
host -a amazon.com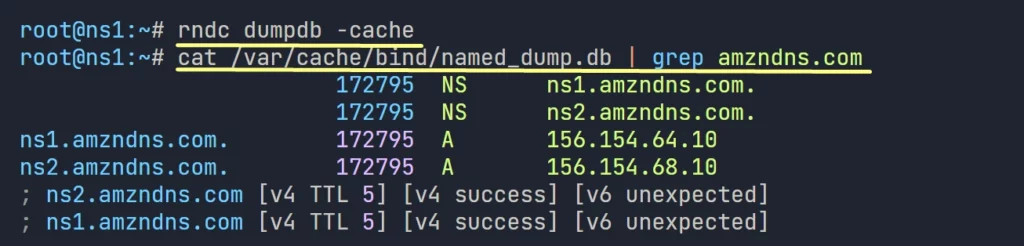
Forwarder caches the response. the same data can be pulled by any client on the network, or by the forwarding DNS also.
2. Now, do the same query on the Forwarding DNS Server (cadns.lab.com)
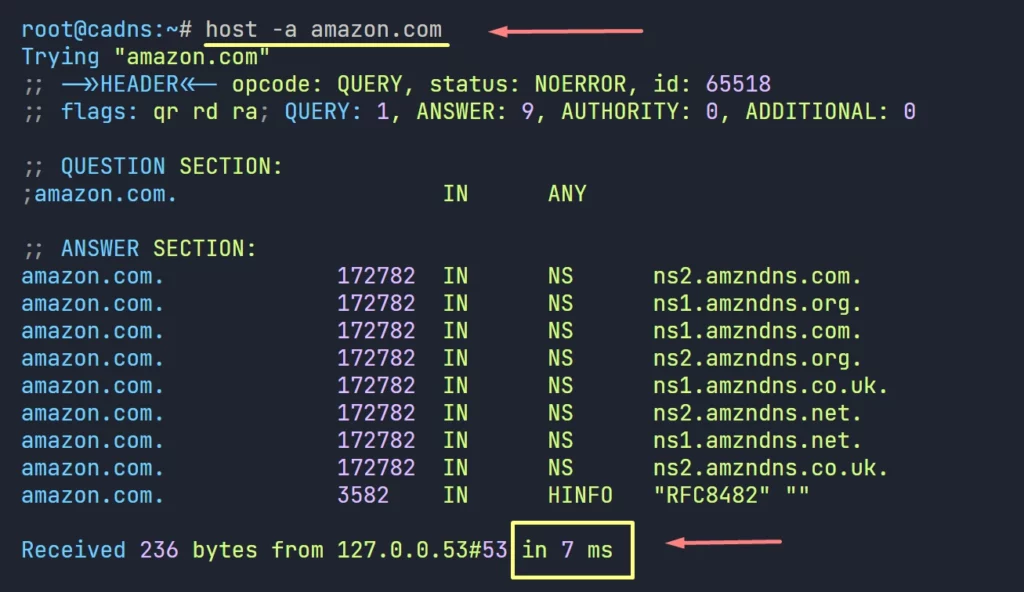
We can see it takes only 7ms to get the result from the Forwarder.
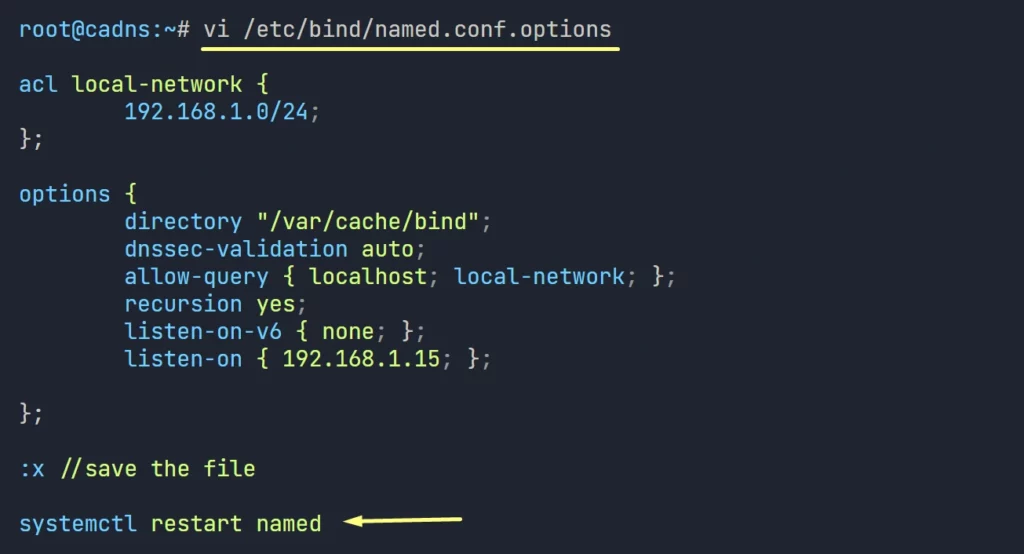
Now, do the same query on the Forwarding DNS Server (cadns.lab.com) without the forwarder defined.
3. Remove the forwarders entry from the named.conf.options. and restart bind service.
4. Now do the zone query again on the Forwarding DNS Server (cadns.lab.com)
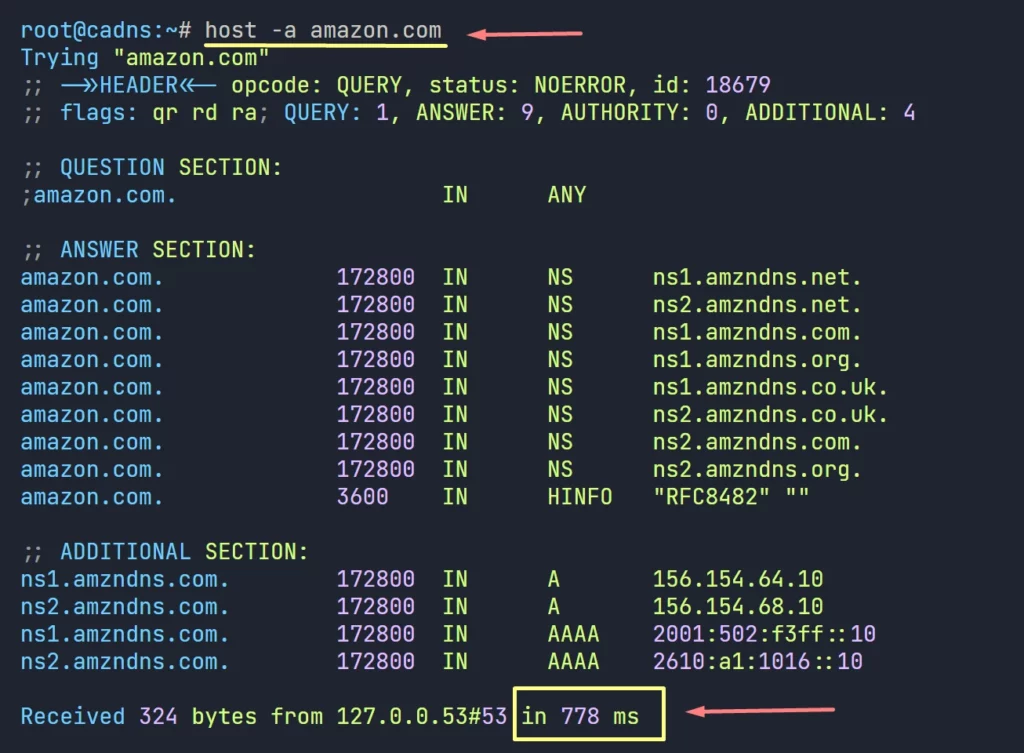
Here we can clearly see the difference, now it is taking 778ms to query the result from the internet, so it is way better to be under a Forwarder DNS.
This concludes our Forwarding and Forwarder DNS tests.
So, this is it for today !!
I hope this guide helps you successfully install and configure a Linux DNS server. I’ve provided a detailed, step-by-step guideline so that you can Install Linux DNS server easily for any business environment.
Now It’s Your Turn
Did we miss anything? Are any of the steps unclear and need further explanation? If you want us to cover any other tutorials, please let us know by leaving a comment below.
Your feedback is very important. It helps us to improve and provide better content.
Thanks👍
👉 If you want to explore more about Linux DNS Server, you can follow this YouTube playlist.

Very nice and detailed article, sir ! One question, i really wanna know what kind of software did you utilize to draw those fancy, beautiful diagrams? Perhaps, an idea to create an article how to make technical beautiful yet professional diagrams like you did in this articles, would be very interesting. I believed that the skill to visualize idea into a clear, concise is one factor that set apart an engineer and a solution architect.
Thanks for the hard work to writing this, much appreciated! May God bless you with prosperity always!
Hi,
Thanks for the comment, i use various tools like, xmind, canva etc..
Thanks
Wow, It is an absolute awesome professional detailed explanation Blog-Article.
Thank you very much for the hard work
You are most Welcome ❤️
Merci pour ce guide c’est vraiment très bien detaille et comprehenssive.
I had to translate what you said ☺️
You are most welcome ❤️
Excellent article!! Very nice presentation.
Following it, i was able to create dns server in my homelab and wow!! it works!!
You are good for teaching. Please, keep going.
Thank you very much.
You are most welcome ❤️
Nice article, is there a video version?
I will try create a new series asap. Thanks !!
I am currently working on my capstone project titled “IPv6 Implementation at IIT Hyderabad.”
As part of this project, I needed to gain a good understanding of DNS (Domain Name System). I had been searching for a long time, but most of the resources I found were too complex or not beginner-friendly.
Fortunately, I found this article and a video series that explained DNS in a very simple and clear way. These resources helped me understand the basics quickly and gave me a solid starting point for applying DNS concepts in my project.
You are most welcome ❤️
Very thanks.please publish an article to tshoot an ubuntu dns server.
This is a fantastic resource for anyone.
You are most welcome ❤️